Difference between revisions of "Main Window"
(→Main Window - add info about information and warning lines) |
(→Main Window Logging) |
||
| (69 intermediate revisions by 2 users not shown) | |||
| Line 1: | Line 1: | ||
==Main Window== | ==Main Window== | ||
| − | + | DXLog's main window also contains the entry lines and the most recent log lines in its lower left corner. | |
| + | The column headers depend on the chosen contest and can also be hidden to save screen real estate. | ||
| − | |||
| + | [[image:maininfo.png]] | ||
| − | |||
| − | + | '''Information and Warning lines''' | |
| − | + | There are three information lines (a "warning" line and two "information" lines) below the log lines. | |
| − | == | + | |
| − | [[image: | + | [[image:Informationline1.png]] |
| + | |||
| + | |||
| + | Useful information regarding multipliers, multiplier spots, own spots, and program actions is shown here. | ||
| + | |||
| + | Other information, such the recognition at start up of a peripheral such as microHAM device,<br> | ||
| + | will be shown in the bottom line. | ||
| + | |||
| + | Some contest definitions include band segment limitations. These are also shown here. | ||
| + | |||
| + | |||
| + | [[image:Informationline2.png]] | ||
| + | |||
| + | |||
| + | By default, alerts for multipliers spotted on the DX cluster are also shown below the entry lines.<br> | ||
| + | Since cluster traffic can be massive during a major contest and there are other means to identify spotted<br> | ||
| + | multipliers (e.g. the [[Menu_Windows#DX-Cluster_announcements|Cluster announcement window]]) there is an option to disable cluster spot<br> | ||
| + | warnings; <code>Options|Log|Hide DX cluster multiplier warnings</code>. | ||
| + | |||
| + | There is also a "status" line in the lower border (the grey area on the bottom of the above screenshot) where<br> | ||
| + | other useful information will be shown. | ||
| + | |||
| + | [[image:statusline1.png]] | ||
| + | |||
| + | |||
| + | '''Important: Holding down CTRL while the program is starting will give you the option to not'''<br> | ||
| + | '''restore the previous layout and log file.''' | ||
| + | |||
| + | ==Toolbar== | ||
| + | |||
| + | The Toolbar offers rapid mouse access to a number of often used functions. | ||
| + | |||
| + | The Toolbar can be hidden using the <code>Options|Toolbar</code> menu option to save screen space. | ||
| + | |||
| + | [[image:ribbonbuttons.png]] | ||
| + | |||
| + | A. New Log | ||
| + | B. Open Exiting Log | ||
| + | C. Close Log | ||
| + | D. QSY Next Lower Band | ||
| + | E. QSY Next Upper Band | ||
| + | F. CW/Digi Keyboard | ||
| + | G. Send a Gab | ||
| + | H. Write a QSO note | ||
| + | I. DXCluster Talk | ||
| + | J. Send Spot | ||
| + | K. Check Multipliers Window | ||
| + | L. Summary Window | ||
| + | M. Check Partials Window | ||
| + | N. Check N+1 Window | ||
| + | O. Status Window | ||
| + | P. Skeds Window | ||
| + | Q. Rates Window | ||
| + | R. Statistics Window | ||
| + | S. Gab Window | ||
| + | T. World Map Window | ||
| + | U. DX Cluster Monitor Window | ||
| + | V. DX Cluster Announcement Window | ||
| + | W. Radio 1 Bandmap Window | ||
| + | X. Radio 2 Bandmap Window | ||
| + | Y. Set split operation | ||
| + | |||
| + | ==Main Window Logging== | ||
| + | |||
| + | Callsign entry is made into the main window to the right of the time. The red block cursor<br> | ||
| + | denotes the active log field. | ||
| + | |||
| + | When more than one entry line is used, the menu option <code>Options|Log|Show cursor in entry line without focus</code> will enable a<br> | ||
| + | shadow cursor in the unselected entry field. | ||
| + | |||
| + | '''Important:''' A very common question from new users is "how do I delete QSO"? <br> | ||
| + | In the spirit of honest contest logging the answer is - you don't.<br> | ||
| + | What you instead do is to mark the logged QSO invalid. (In Cabrillo terminology this is referred to as an X-QSO.)<br> | ||
| + | To do this, navigate to the desired QSO and press <code>[Ctrl][X]</code>. Should you change your mind, just repeat the process. | ||
| + | |||
| + | |||
| + | [[image:mainscreen1.png]] | ||
| + | |||
| + | |||
| + | Right-clicking the main window background will also bring forward the <code>Options|Log</code> menu. | ||
| + | |||
| + | Use <code>[Space]</code> to step through relevant entry fields. <code>[Tab]</code> will step through ''all'' entry fields. | ||
| + | |||
| + | If you use more than one entry field (e.g. in SO2R or SO2V) you move between them with <code>[Up]</code> and <code>[Down]</code>. | ||
| + | |||
| + | For more details on keyboard shortcuts and entry line/log navigation, see [[Keyboard_and_text_functions#Keyboard_functions|keyboard functions]]. | ||
| + | |||
| + | ==Main Window Options== | ||
| + | |||
| + | Right clicking the main screen or selecting the menu <code>Options|Log</code><br> | ||
| + | will give you an options menu to customize the main window. | ||
| + | |||
| + | |||
| + | [[image:mainscreencontxt.png]] | ||
| + | |||
| + | |||
| + | {|class="wikitable" | ||
| + | |+style="text-align:Left;"|Main window options | ||
| + | |- | ||
| + | |Fonts | ||
| + | |4 Sizes selectable | ||
| + | |- | ||
| + | |Headers, Hide | ||
| + | |Turn on or off the log column labels | ||
| + | |- | ||
| + | |Hide DX cluster multiplier warnings | ||
| + | |Turn on or off the display of DX cluster spots being multipliers | ||
| + | |- | ||
| + | |Hide alerts for being spotted on other band(s) | ||
| + | |Turn on or off the display of alerts of being spotted on band(s)<br>other than the currently operated. | ||
| + | |- | ||
| + | |Hide QSO Numbers | ||
| + | |Hides the QSO numbers on the left, useful for serial number contests<br>so wrong serials don't get sent | ||
| + | |- | ||
| + | |Always show mode in QSO lines | ||
| + | |Shows the radio mode in the QSO line, useful for multi mode contest on review | ||
| + | |- | ||
| + | |Show date in QSO lines | ||
| + | |Shows the QSO date in the QSO line | ||
| + | |- | ||
| + | |Shows frequency in QSO line | ||
| + | |Shows the QSO frequency in the QSO line | ||
| + | |- | ||
| + | |Show operator name in QSO line | ||
| + | |Shows the operators name, if OPON / OPOFF is used during operation. | ||
| + | |- | ||
| + | |Colors | ||
| + | |Change the colors on the main window | ||
| + | |- | ||
| + | |Position | ||
| + | |Change the location of the log and entry field(s). | ||
| + | |- | ||
| + | |SO2R/V view type | ||
| + | |Classic, Side by Side or Separate Window | ||
| + | |- | ||
| + | |Stay in field while moving up and down in the log | ||
| + | |If disabled the cursor returns to the callsign field otherwise the cursor<br>stays in the field selected. | ||
| + | |- | ||
| + | |Use focus background color in SO2R(V) | ||
| + | |Sets R2 or VFO2 data entry line a different color to R1 entry line | ||
| + | |- | ||
| + | |Show previous and current messages | ||
| + | |Display the messages being sent below the radio radio log line, and the previous<br>sent message above the radio log line. (color: Msgs Color). | ||
| + | |- | ||
| + | |Show RX status color | ||
| + | |Colors the radios' log entry lines (color: RX background) when the radio's audio is enabled. | ||
| + | |- | ||
| + | |Show border on TX | ||
| + | |Puts a border around a radio's log entry line (color: TX border color) when<br>that radio is transmitting. | ||
| + | |- | ||
| + | |Show RX wait border | ||
| + | |Puts a border around a radio's log entry line (color: RX wait color) when a<br>footswitch is configured as RX Wait and pressed. | ||
| + | |- | ||
| + | |Show cursor in entry line without focus | ||
| + | |Shows a shadow cursor (color: Non-Focus Cursor) in the non-focused radio's log entry line. | ||
| + | |} | ||
| + | |||
| + | The background color of the entry line can also be changed to highlight risk for band change time violation.<br> | ||
| + | See the [[Menu_Options#Networking|Networking menu]] section. | ||
| + | |||
| + | ==Main Window Color Options== | ||
| + | |||
| + | The color of most UI elements in the main window can be customized. | ||
| + | |||
| + | [[image:mainscreencol.png]] | ||
| + | |||
| + | ==SO2R/V Classic== | ||
| + | |||
| + | The classic layout for SO2R and SO2V will have the two entry lines on top of each other.<br> | ||
| + | This is best suited for single keyboard operation. | ||
| + | |||
| + | |||
| + | [[image:mainso2rv.png]] | ||
| + | |||
| + | ==SO2R/V Side by Side== | ||
| + | |||
| + | The side-by-side layout for SO2R and SO2V will have the two entry lines beside each other.<br> | ||
| + | Some prefer this slightly larger visual separation for dual keyboard operation. | ||
| + | |||
| + | |||
| + | [[image:mainso2rvss.png]] | ||
Latest revision as of 09:47, 28 August 2023
Contents
Main Window
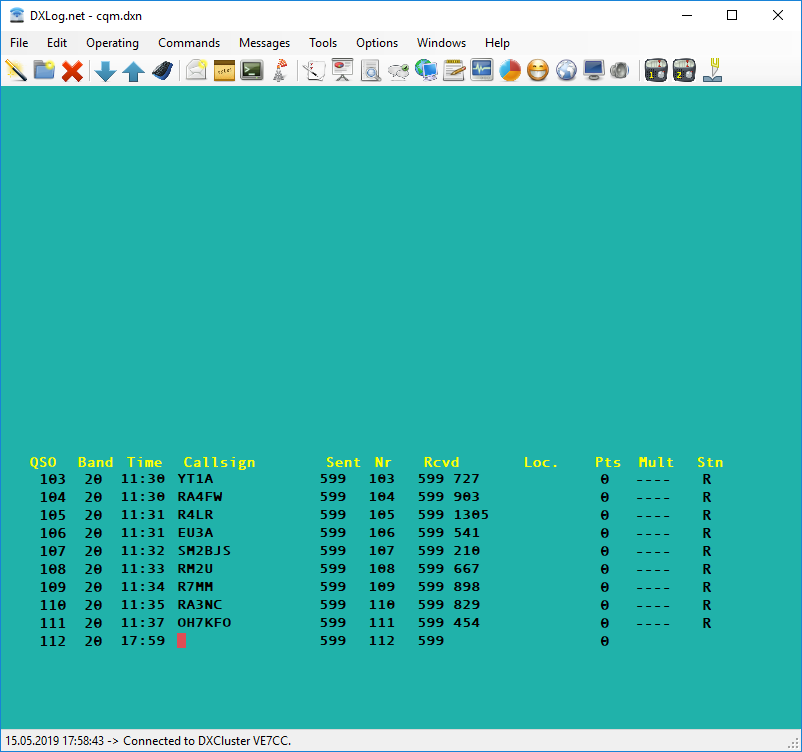
DXLog's main window also contains the entry lines and the most recent log lines in its lower left corner.
The column headers depend on the chosen contest and can also be hidden to save screen real estate.
Information and Warning lines
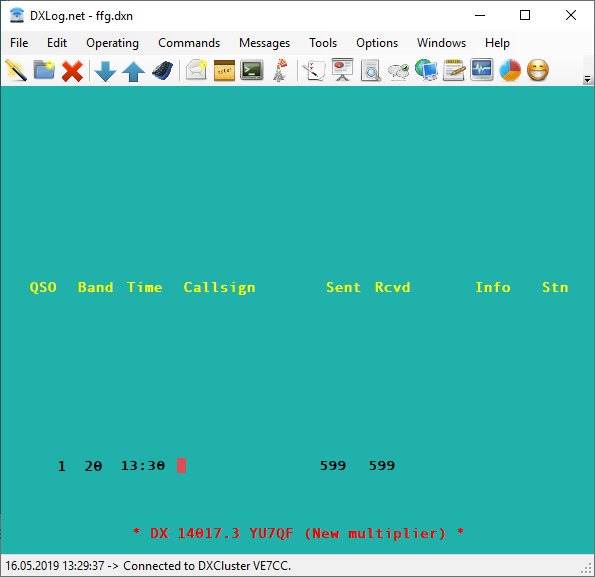
There are three information lines (a "warning" line and two "information" lines) below the log lines.
Useful information regarding multipliers, multiplier spots, own spots, and program actions is shown here.
Other information, such the recognition at start up of a peripheral such as microHAM device,
will be shown in the bottom line.
Some contest definitions include band segment limitations. These are also shown here.
By default, alerts for multipliers spotted on the DX cluster are also shown below the entry lines.
Since cluster traffic can be massive during a major contest and there are other means to identify spotted
multipliers (e.g. the Cluster announcement window) there is an option to disable cluster spot
warnings; Options|Log|Hide DX cluster multiplier warnings.
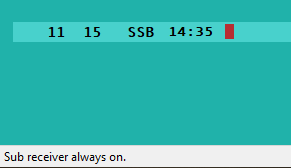
There is also a "status" line in the lower border (the grey area on the bottom of the above screenshot) where
other useful information will be shown.
Important: Holding down CTRL while the program is starting will give you the option to not
restore the previous layout and log file.
Toolbar
The Toolbar offers rapid mouse access to a number of often used functions.
The Toolbar can be hidden using the Options|Toolbar menu option to save screen space.
 A. New Log
 B. Open Exiting Log
 C. Close Log
 D. QSY Next Lower Band
 E. QSY Next Upper Band
 F. CW/Digi Keyboard
 G. Send a Gab
 H. Write a QSO note
 I. DXCluster Talk
 J. Send Spot
 K. Check Multipliers Window
 L. Summary Window
 M. Check Partials Window
 N. Check N+1 Window
 O. Status Window
 P. Skeds Window
 Q. Rates Window
 R. Statistics Window
 S. Gab Window
 T. World Map Window
 U. DX Cluster Monitor Window
 V. DX Cluster Announcement Window
 W. Radio 1 Bandmap Window
 X. Radio 2 Bandmap Window
 Y. Set split operation
Main Window Logging
Callsign entry is made into the main window to the right of the time. The red block cursor
denotes the active log field.
When more than one entry line is used, the menu option Options|Log|Show cursor in entry line without focus will enable a
shadow cursor in the unselected entry field.
Important: A very common question from new users is "how do I delete QSO"?
In the spirit of honest contest logging the answer is - you don't.
What you instead do is to mark the logged QSO invalid. (In Cabrillo terminology this is referred to as an X-QSO.)
To do this, navigate to the desired QSO and press [Ctrl][X]. Should you change your mind, just repeat the process.
Right-clicking the main window background will also bring forward the Options|Log menu.
Use [Space] to step through relevant entry fields. [Tab] will step through all entry fields.
If you use more than one entry field (e.g. in SO2R or SO2V) you move between them with [Up] and [Down].
For more details on keyboard shortcuts and entry line/log navigation, see keyboard functions.
Main Window Options
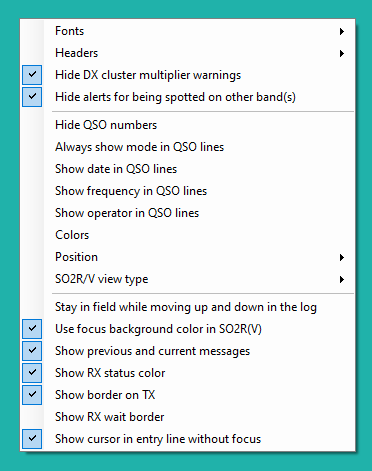
Right clicking the main screen or selecting the menu Options|Log
will give you an options menu to customize the main window.
| Fonts | 4 Sizes selectable |
| Headers, Hide | Turn on or off the log column labels |
| Hide DX cluster multiplier warnings | Turn on or off the display of DX cluster spots being multipliers |
| Hide alerts for being spotted on other band(s) | Turn on or off the display of alerts of being spotted on band(s) other than the currently operated. |
| Hide QSO Numbers | Hides the QSO numbers on the left, useful for serial number contests so wrong serials don't get sent |
| Always show mode in QSO lines | Shows the radio mode in the QSO line, useful for multi mode contest on review |
| Show date in QSO lines | Shows the QSO date in the QSO line |
| Shows frequency in QSO line | Shows the QSO frequency in the QSO line |
| Show operator name in QSO line | Shows the operators name, if OPON / OPOFF is used during operation. |
| Colors | Change the colors on the main window |
| Position | Change the location of the log and entry field(s). |
| SO2R/V view type | Classic, Side by Side or Separate Window |
| Stay in field while moving up and down in the log | If disabled the cursor returns to the callsign field otherwise the cursor stays in the field selected. |
| Use focus background color in SO2R(V) | Sets R2 or VFO2 data entry line a different color to R1 entry line |
| Show previous and current messages | Display the messages being sent below the radio radio log line, and the previous sent message above the radio log line. (color: Msgs Color). |
| Show RX status color | Colors the radios' log entry lines (color: RX background) when the radio's audio is enabled. |
| Show border on TX | Puts a border around a radio's log entry line (color: TX border color) when that radio is transmitting. |
| Show RX wait border | Puts a border around a radio's log entry line (color: RX wait color) when a footswitch is configured as RX Wait and pressed. |
| Show cursor in entry line without focus | Shows a shadow cursor (color: Non-Focus Cursor) in the non-focused radio's log entry line. |
The background color of the entry line can also be changed to highlight risk for band change time violation.
See the Networking menu section.
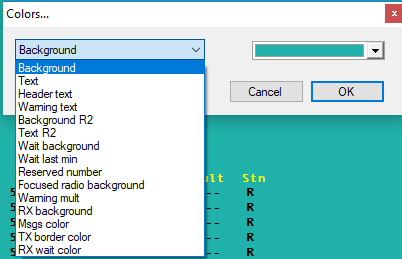
Main Window Color Options
The color of most UI elements in the main window can be customized.
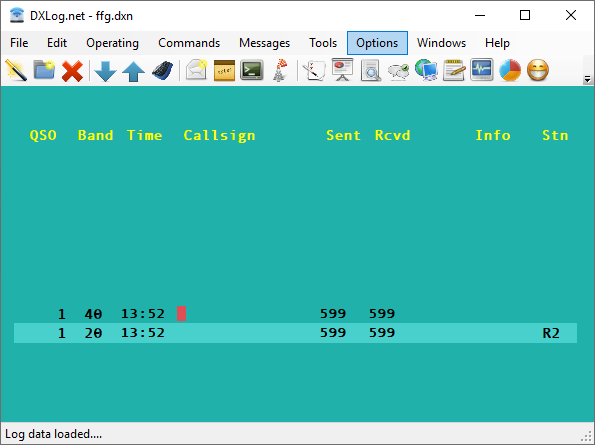
SO2R/V Classic
The classic layout for SO2R and SO2V will have the two entry lines on top of each other.
This is best suited for single keyboard operation.
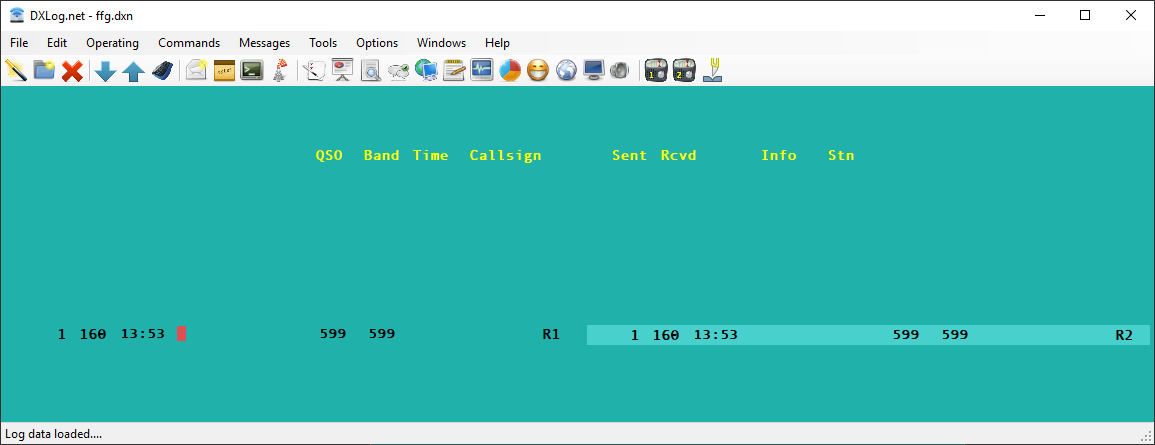
SO2R/V Side by Side
The side-by-side layout for SO2R and SO2V will have the two entry lines beside each other.
Some prefer this slightly larger visual separation for dual keyboard operation.
