Menu Operating
Contents
- 1 Period autoswitch
- 2 Bandmap
- 3 Technique
- 4 Listen to the primary radio
- 5 Listen to the secondary radio (headphone toggle)
- 6 Listen to the secondary radio (headphone latch)
- 7 Listen to both radio (headphone Split)
- 8 Edit SO2R Scenarios
- 9 SO2R scenario selection
- 10 CAPS lock binds to secondary radio
- 11 Shift binds to opposite radio
Period autoswitch
Some contest rules specify that operating must be split into more than one period, periods are defined by a length of time.
In the relevant contest configuration file, it is possible to define the length and number of time periods.
When this option is activated, DXLog.net automatically switches the contest period to the next one when the current active period elapses.
Bandmap
File:Operating bandmap menu.png
The "BANDMAP" window shows possible call-signs available on the current band.
Open the bandmap window by selecting the "WINDOWS" menu and select "RADIO 1" or/and "RADIO 2"
The bandmap is especially useful when connected to a DXCluster as all "in band" spots received will be placed on the bandmap.
With spots showing on the "RADIO 1" or/and "RADIO 2" band map the following commands / shortcut keys can be used to aid operating.
- "Add with SPACEBAR"
By default, you can add a new manual entry into the bandmap by entering a callsign in the "log callsign entry field" then pressing CTRL+ENTER.
After the callsign is added to the bandmap, the "log entry callsign field" is cleared.
When this option is activated, a new manual entry into the bandmap will be created when spacebar is pressed on the current QSO.
but this time the "log entry callsign field" isn't cleared.
- "QSY opposite radio instead of 2nd VFO"
When checked, pressing CTRL+ALT+UP/DOWN will move through the bandmap using the opposite radio main VFO (instead of active radio second VFO).
- "Grab the spot on or near frequency"
Shortcut: CTRL+SPACE
Grab the spot that is highlighted or the spot nearest the present frequency.
- "Grab first valid upper spot"
Shortcut: CTRL+UP ARROW
You can select the first upper valid callsign from your current frequency and grab it into the "log callsign entry field" by pressing CTRL+UP ARROW.
- "Grab first valid upper spot to 2nd VFO"
Shortcut: CTRL+ALT+UP ARROW
Get the first upper valid callsign from your current 2nd VFO frequency and grab it into the 2nd VFO. Note: the cursor on the bandmap will not move (it is indicating the primary VFO) and the call will not be placed in the log callsign entry field.
- "Grab first valid upper multiplier spot"
Shortcut: CTRL+SHIFT+UP ARROW
Selects first upper multiplier callsign from your current frequency and grab it into the "log callsign entry field" when pressing CTRL+SHIFT+UP ARROW.
- "Grab first valid lower spot"
Shortcut: CTRL+DOWN ARROW
You can select the first lower valid callsign from your current frequency and grab it into the "log callsign entry field" by pressing CTRL+DOWN ARROW.<br
- "Grab first valid lower spot to 2nd VFO"
Shortcut: CTRL+ALT+DOWN ARROW
Get the first lower valid callsign from your current 2nd VFO frequency and grab it into the 2nd VFO. Note: the cursor on the bandmap will not move (it is indicating the primary VFO) and the call will not be placed in the log callsign entry field.
- "Grab first valid lower multiplier spot"
Shortcut: CTRL+SHIFT+DOWN ARROW
Selects first lower multiplier callsign from your current frequency and grab it into the "log callsign entry field" when pressing CTRL+SHIFT+DOWN ARROW.
Technique
This selects the category you are going to join and enable/disable software features according.
- SO1R/Multi op
Must be selected if you are SO with 1 radio or any Multi operators category.
Headphone audio options are DISABLE
Only one entry QSO line is enable.
- SO2R
Must be selected if you are SO with 2 radios.
Headphone audio options menu is ENABLE
    Listen to primary radio

    Shortcut: CTRL+ALT+A
      You can ear primary radio audio on both ears
    Listen to secondary radio

    Shortcut: CTRL+ALT+T
      You can ear secondary radio audio on both ears
    Listen to secondary radio during transmit

    Shortcut: CTRL+ALT+L
      You can ear secondary radio audio on both ears while TX with primary
    Listen to both radios

    Shortcut: CTRL+ALT+S
      You can ear primary audio in one ear and secondary radio audio in the other at same time
All commands work if your are managing the 2 radios using machine like EZMaster or Microham MK2R+/MK2R/U2R
Two entry QSO line are enable, one controlling R1 and the other R2. You can swap between them using "*" or "ARROW UP/DOWN" key

- Advanced SO2R
All commands work if your are managing the 2 radios using machine like EZMaster or Microham MK2R+/MK2R/U2R
Must be selected if you are SO with 2 radios.
Headphone audio options menu is ENABLE (same commands as per SO2R)
Special strings of command called SCENARIO are ENABLE
Scenario string is a sequence of commands that can be sent to control radios behave and audio status automatically.
It can be assigned to each Fx key both for R1 and R2.There are some "ready to go" scenarios or you can programm your own. To program scenario you must select the proper window in menu OPERATING -> Edit SO2R scenarios
Scenario can work all modes: CW,SSB and RTTY.
String can be composed by a logic of commands sequence that starts when pressing a Fx key.
An simple example of string can be:
File:Scenario.jpg
Primary radio is not R1 but is radio with TX FOCUS, secondary radio is not R2 but is radio without TX FOCUS
If you press primary radio F1 you will have automatically switched left and right headphone ears on secondary radio audio (command $R2R2)in this case R2 then message of F1 start to play (command $F1) and, at the end of it, you have audio back to primary radio (command $R1R1) in this case R1 on both ears.
If you need to call a multiplier on R2, for example, you press F4 on secondary radio and you have:
Audio to primary radio (command $R1R1) in this case R1 on both ears.
F4 message starts to play (command $F4) on primary radio in this case R2
Audio to secondary radio (command $R2R2) in this case R2 on both ears
Change TX focus on secondary radio in this case R1 (command $STR2)
Start to play additional message 1 set into ALT+C window such as "CQ TEST" to secondary radio in this case R1 (command: $MSG1)
When finished msg1 audio is switched R1 on left ear and R2 on right ear simultaneously (command $R1R2)
- SO2V (Single op 2 VFO's)
This selection allows you to use 2 different VFO as per 2 separate radios
TO DO THIS YOU NEED A RADIO WITH 2 SEPARATE RECEIVERS INCLUDED
Listen to the primary radio
Shortcut: CTRL+ALT+A
This feature can be used only if you select your as SO2R or SO2R Advanced
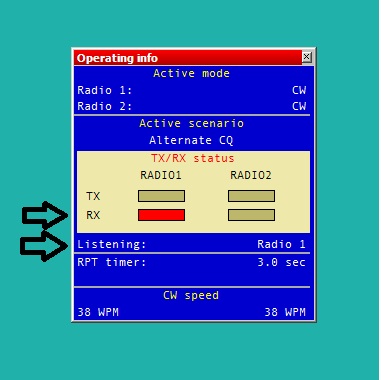
This feature brings your audio from your primary radio to both sides of your headphone
You can have a visual information of the selection by opening "Operating info" in menu "WINDOWS"->"OPERATING INFO"
You will have an information like:
Listen to the secondary radio (headphone toggle)
Shortcut: CTRL+ALT+T
This feature can be used only if you select your as SO2R or SO2R Advanced
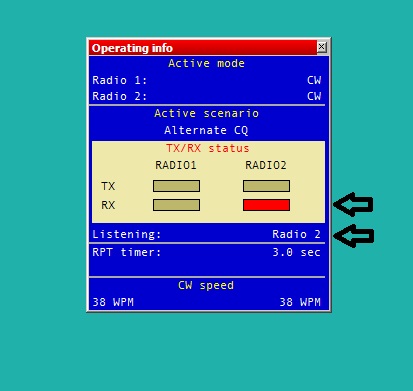
This feature brings your audio from your secondary radio to both sides of your headphone
You can have a visual information of the selection by opening "Operating info" in menu "WINDOWS"->"OPERATING INFO"
You will have an information like:
Listen to the secondary radio (headphone latch)
Shortcut: CTRL+ALT+L
This feature can be used only if you select your as SO2R or SO2R Advanced
This feature brings your audio from your secondary radio to both sides of your headphone while primary radio is in TX
Listen to both radio (headphone Split)
Shortcut: CTRL+ALT+S
This feature can be used only if you select your as SO2R or SO2R Advanced
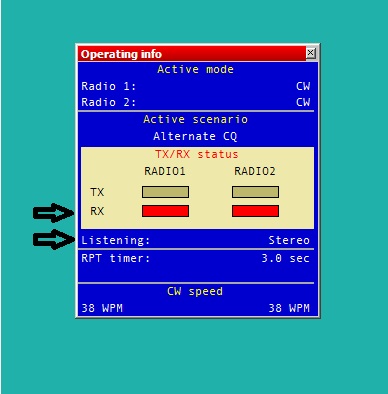
This feature bring your audio from your primary and secondary radio each one to one side of your headphone
You can have a visual information of the selection by opening "Operating info" in menu "WINDOWS"->"OPERATING INFO"
You will have an information like:
Edit SO2R Scenarios
Scenarios are available only if you select technique as SO2R ADVANCED
This feature can only play using a SO2R machine like MICROHAM MK2R or EZMASTER
The goal for a scenario is to have interactive automatic behave between the 2 radios.
You can control TX focus (which radio can TX) and RX focus (which radio you want to listen to).
The behave of each line is composed using a sequence of variables (called macro)
Let's see an example:
Scenario in picture is called "ALTERNATE CQ", it calls alternatively CQ on both radios.
When you press F1 on R1 (primary radio):
Log cursor swaps to R2 call-field line (command $FOCUS2)
Any possible audio choice activated by keyboard is deleted (command $RESET)
RX focus (audio) is switched to R2 on both ears (command $R2R2)
Starts to send message saved on F1 memory i.e. CQ CONTEST (command $F1)
RX focus (audio) is changed to R1 left ear and R2 right ear (command $R1R2)
When F1 memory is completely sent it swaps again log cursor on R1 and starts TX F1 to R2 (command $ALTERNATECQ)
If you have a caller and you start typing the callsign in log, after the CQ on opposite radio is sent, DXL recognize a filed is fill-in so it stops from cq-ing and give TX focus to the radio with callsing.
At this moment you can work the station by using "insert" key
There are some preset scenarios available but you can modify any of them or set your own just using the available macro commands.
The variables to programm each string are:
   $GRNR sends gr/num of the received QTC
   $SERIAL sends QSO #
   $LOGGEDCALL send what's typed in callsign field
   $TR1 and $TR2 primary radio or secondary radio tx
   $GRABSPOT, which grabs spot on the current frequency
   $ZONE sends zone nr set in contest configuration
   $R1R1, $R1R2, $R2R1, $R2R2 which can be entered in the predefined CW messages to set the headphone
   $INSERT and $PLUS send messages behind ins or +
   $RESET cancels any manual change made in the audio control
   $ALTERNATECQ (or $ACQ) swaps primary and secondary radios and send CQ on the secondary radio
   $CQ same as $ALTERNATECQ but does not swap radios
   $MSG1...$MSG12: additional CW messages (see Alt + C)
   $SPACEBAR works like hitting spacebar-key (move cursor to exchange field)
   $TAB work like hitting tab-key (move cursor to next field)
   $GUESSZONE filling exchange field(s) if possible, but cursor remains in the same edit field
   $GUESSEXCH (or $GUESSEXCHANGE) mimics a space bar hit (filling exchange field(s)
   $CR works like hitting enter-key (log QSO)
   $MYCALL sends callsign set in contest configuration
   $REPEAT Reset the automatic repeat mode interval
   $CORRECT send a call correction, if any
   $F1...$F6 send the message associated with F1 ... F6 function key
   $LATCH sets latch mode
   $QSOB4 send QSOB4 message if the current QSO is a dupe
   $CHECK: send license year (ARRL SS only)
   $CORRECT: sends a call correction, if any (see correction)
   $CURRENT (or $CURRENTCALL): Sends the callsign of the current QSO despite the presence of a $CR later in the message. The $CR (carriage return) is always executed on message keypress. It is also useful in ESM (Enter Sends Message) mode in lieu of $LOGGEDCALL.
   $FREQnn: Where nn is a band (e.g. $FREQ160, $FREQ80 etc.). Useful in a multi-op as a canned message "PSE QSY $FREQ15". Sends the frequency of the primary radio of the first networked station found on this band with the following priority : R, R+, M, and M+.
   $FREQP: contains the frequency of the primary radio (useful for passing mults)
   $FREQS: contains the frequency of the secondary radio (useful for passing mults)
   $INSERT: sends message in the [Ins] key
   $ISLAND: sends IOTA Reference (i.e. EU001, AF001, ...) (IOTA Contest)
   $LOGGED (or $LOGGEDCALL): sends what is typed in the callsign field of the current QSO, or if blank, the previous QSO
   $MSG1...$MSG12: sends additional CW messages (see Modify additional messages)
   $MYCALL: sends callsign set in contest configuration
   $MYNAME: sends operator name, set in contest configuration
   $NEXT (or $NEXTCALL): sends the callsign of the next QSO line when a $CR is included in the message.
   $NEXTSERIAL: sends next QSO serial number (current QSO serial number plus 1)
   $PLUS: sends message in the [+] key
   $PREV (or $PREVCALL): sends the callsign on the previous QSO line.
   $PREVSERIAL: sends previous QSO serial number (current QSO serial number minus 1)
   $QSOB4: sends the QSOB4 message and cancels the remainder of the current message, if the current QSO is a dupe, otherwise     sends nothing
   $RST: sends report from RST Sent field (normally 5NN)
   $SERIAL: sends current QSO Serial Number, or previous serial number if the line with the cursor is blank.
   $STATE: sends State/Province set in contest configuration (Exchange)
   $YEAR: sends year nr set in contest configuration (i.e. EUHFC, AA)
   $ZONE: sends zone nr set in contest configuration
   &xy: sends a Morse prosign where xy represents the two characters forming the prosign, e.g. &AS, &AR, &BK, &BT, &CL, &KN, &SK, etc.
   +: increase speed by 4 wpm
   -: decrease speed by 4 wpm
   ^: the halfspace character with 1/2 dot duration
   ~: (tilde) at then end of a variable means "no space" will be inserted, e.g. $NEXT~? sends the next callsign followed by a question mark, with no space in between
   $CR: works like hitting [Enter] (log QSO)
   $GRABPARTNER: grabs the first callsign from the Partner window and inserts it in the callsign field.
   $GRABSPOT grabs spot on the current frequency
   $GUESSEXCH (or $GUESSEXCHANGE): mimics a space bar hit, filling the exchange field(s) if possible, but the cursor remains in the same edit field.
   $REPEAT: restarts the automatic repeating CQ sequence (if enabled), after pausing for the specified interval. Most useful at the end of the [Plus] key message to avoid having to press [F1] to start CQing again.
   $RSTEXCHSENT: Resets the "exchangeSent" flag of the active QSO (useful only for ESM scripts)
   $SETEXCHSENT: Sets the "exchangeSent" flag of the active QSO (useful only for ESM scripts)
   $SPACEBAR: works like hitting spacebar-key (move cursor to the next most-used field)
   $TAB: works like hitting [Tab] (move cursor to next field)
   $ALTERNATECQ (or $ACQ): swaps primary and secondary radios and send CQ on the secondary radio
   $CQ: same as $ALTERNATECQ but does not swap radios
   $LATCH: sets latch mode
   $SPACEBAR    - same as $SPACE (press spacebar in currently active field)
   $CHECKCALL   - move focus to callsign and press spacebar
   $GUESSEXCH   - try to guess exchange, focus stays in currently active field
   $LOGQSO      - silently save QSO (useful in ESM + S&P mode)
   $CTRLPLUS    - same sa $LOGQSO
   $FOCUSCALL   - move entry focus to Callsign field
   $FOCUSRCVD   - move entry focus to Rcvd field
   $FOCUSREC1   - move entry focus to RecInfo field
   $FOCUSREC2   - move entry focus to RecInfo2 field
   $FOCUSREC3   - move entry focus to RecInfo3 field
   $FOCUS1      - change Focused radio to Radio 1
   $FOCUS2      - change Focused radio to Radio 2
   $SWAPFOCUS   - change Focused radio to opposite Radio
   $GRABPARTNER - grab next call from partner window into callsign field in current entry line
   $MK2R=cmd: send a specific MK2R command to the microHAM MK2R SO2R box.
All strings can be edited "on-the-fly" pressing Shift+Fx keys.
You need to enable this feature in menu TOOLS->MESSAGE EDITORS
All commands work if your are managing the 2 radios using machine like EZMaster or Microham MK2R+/MK2R/U2R
SO2R scenario selection
There are some available scenarios in DXL but you still can make new ones and save them using a specific name.
You can select a tab in scenario editor window and play with it
When you are operating you may need to change scenario according to operative situations.
You can go to menu "OPERATIVE"->"SO2R SCENARIO SELECTION" and choose one scenario from the pop-up window
You can also use shortcuts to select the desired scenario using "CTRL+ALT+#" where # is the number corespondent to the scenario you want to have
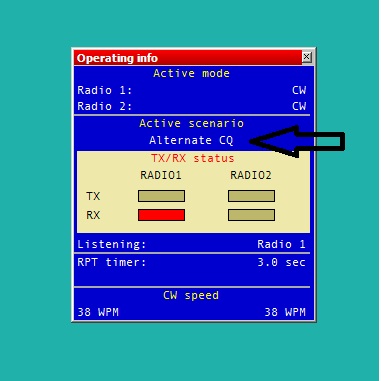
You may need to see which scenario is loaded and which you are selecting using shortcuts
For this reason you may need to open "Operating info" from menu "WINDOWS"->"OPERATING INFO"

This window shows which scenario is selected.
CAPS lock binds to secondary radio
Activating CAPS lock will direct keyboard input to the secondary radio. Turning off CAPS lock will return input to the primary radio.
Shift binds to opposite radio
Pressing (and holding) the LEFT SHIFT key (when using an SO2R technique) will direct keyboard input to the opposite radio log line. Note that releasing the LEFT SHIFT key will return input to the other radio. This allows for quick editing of data on opposite radio without moving the active focus.


