Additional Information
Contents
- 1 Using alternative configurations
- 2 Using a number server
- 3 Networking over internet
- 4 Real time upload to Club Log Live Stream
- 5 Diversity reception
- 6 UDP broadcast
- 7 SDR integration
- 8 Time synchronization
- 9 Disabling USB power management
- 10 Interlock and inband operation
- 11 Connecting a footswitch
- 12 Support for CC Cluster
- 13 Support for AR Cluster 6
- 14 Support for DXSpider
- 15 Interacting with WSJT-X
- 16 Using Winkey FSK
- 17 Interfacing with LogHX
- 18 Self-spotting
Using alternative configurations
Window positions, coloring and general look and feel is saved in each log file but all other settings such as
radio control, keying, and networking is saved in a common, contest-independent configuration file.
By default, the configuration file name is DXLog.net.config. It is located in the %appdata%\DXLog.net system folder.
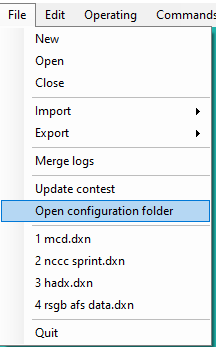
This folder is also reachable via the File|Open configuration folder menu.
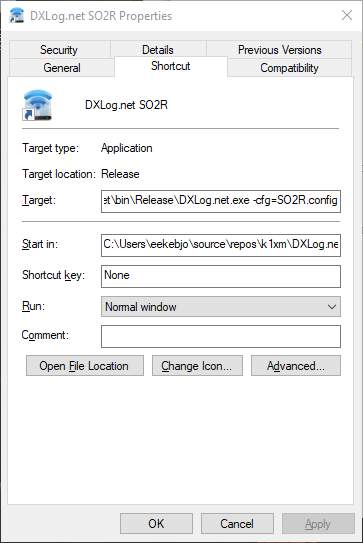
DXLog can be made to use an alternative configuration file with the command line option -cfg=<filename>.
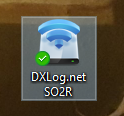
A convenient way to use this option is to create a separate Windows desktop shortcut including the command line option
and give it a meaningful name.
The command line option is simply added to the end of the Target text box in the shortcut's properties.
Double-clicking the icon will start DXLog with the alternative configuration which will also be remembered between sessions.
Important: If you want to use an alternative configuration, do not just modify the desktop shortcut created at installation
since this shortcut will be deleted when you upgrade DXLog. Instead make a copy, rename, and add the command line option.
Alternatively, create a new shortcut, pointing to the executable file C:\Program Files (x86)\DXLog.net\DXLog.net.exe
Using a number server
For contests involving serial numbers you need to secure that the sent number and the (slightly later)
logged serial numbers are the same. In a straightforward SO1R or SO2V scenario, serial numbers are simply
chronological but in more complex station configurations such as Multi-single with inband, Multi-Multi, and
advanced SO2R, QSO can be interleaved and requires a central source source of serial numbers together
with a mechanic to protect an already sent serial number from re-use by another radio.
In DXLog this is achieved with a central number server. A number server can be used either
by a single instance of DXLog (for SO2R) or by multiple stations on the same LAN.
The use of a number server involves three, natural, steps:
- Activating the server on a single station
- Making sure all stations to use it
- Verifying functionality, making sure serial numbers are correctly reserved
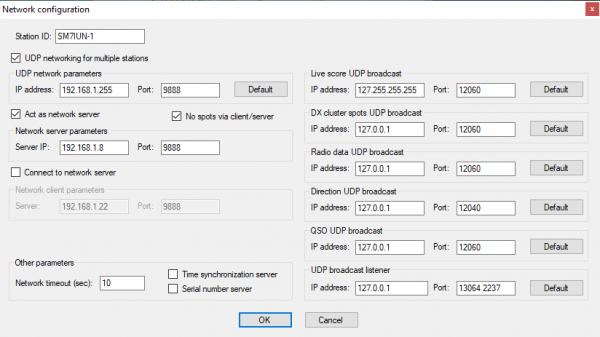
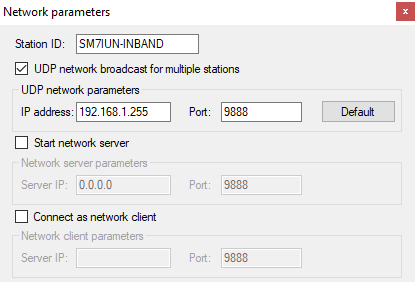
The number server is activated in the Options|Configure network panel, described HERE.
Since the server uses a networking socket, Options|Networking must be enabled also when
using a single computer in SO2R. In the case of multiple stations, UDP networking or Client-Server
networking must also be enabled to transfer the numbers over the LAN. For SO2R, this is however not
necessary.
There must only be one number server in a local network and all stations using it must have
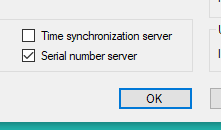
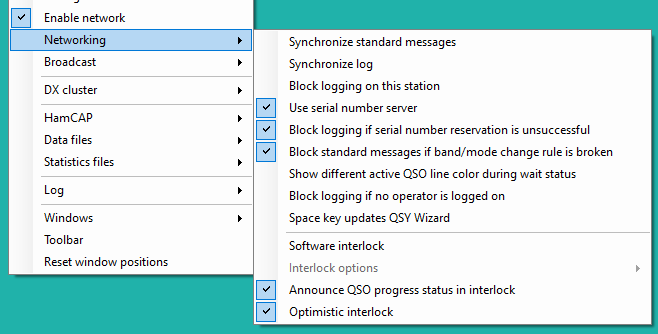
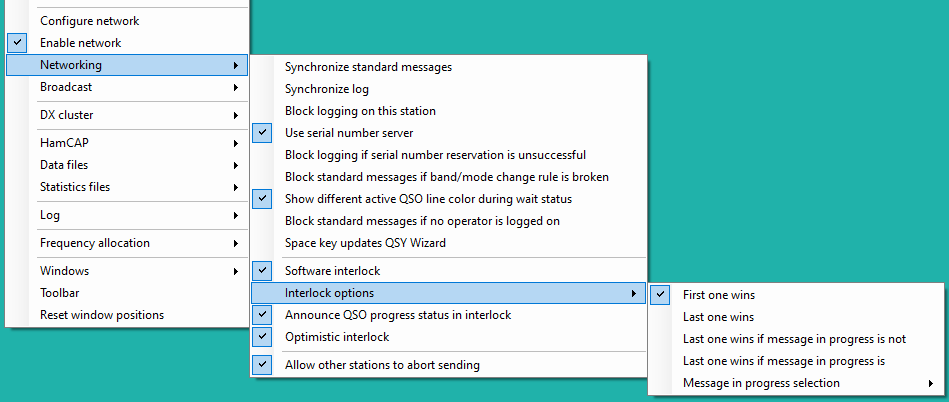
Options|Networking|Use number server checked like in the picture below.
Important: The number client/server functionality is not very robust.
If you have stations joining/leaving your network or being rebooted, it is
best to restart all stations to guarantee correct function.
The option Block logging if serial number reservation is unsuccessful can be used as an extra precaution
but is not necessary in SO2R since the communication with the number server does not leave the computer.
There are three methods for reserving a number from the server:
- Checking
Tools|Data entry|Space key reserves serial numberand using the space key to reserve serial numbers.
This is typically used on phone. - Checking
Tools|Data entry|Insert and F2 messages reserve serial numberand letting DXLog automatically reserve a
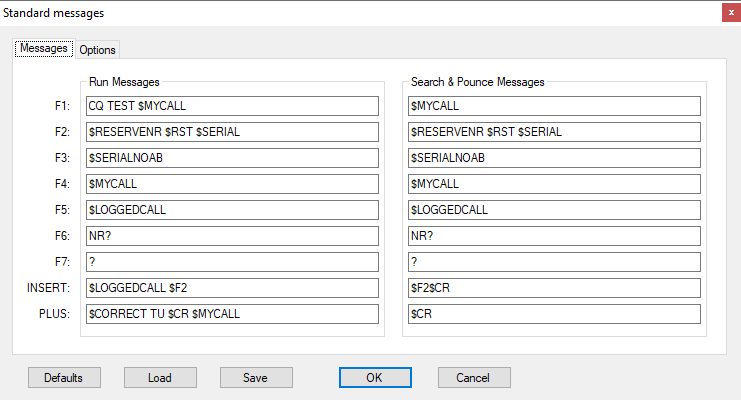
serial number right before $SERIAL sends it. This is the preferred and most straightforward way for CW and digital. - Adding the $RESERVENR macro to messages like illustrated below.
These methods can of course also be combined.
The $RESERVENR macro is "smart" and will only reserve a serial number if the callsign entry field is not empty and a
serial number is not already reserved. The same goes for the menu items.
The sign of a serial number being reserved is that it turns red. It then stays reserved (and red) until the
QSO is logged or the entry line is cleared with [Alt][W].
An option that can prove useful is Tools|Data entry|Cancel serial number reservation only if callsign field is empty.
In the case that you send the exchange and realize you got the other station's callsign call completely wrong, a reflex can be to hit
[Alt][W] and start typing. If this is your habit, this option will prevent you from releasing the
already sent serial number, thereby avoiding you the trouble to send a new one to the other station.
Networking over internet
When, for instance, activating a special event callsign it is possible to network multiple DXLog stations over the internet.
Pro tip: Consider displaying the callsign, message ID, Message text, etc. fields in the Network status
window when operating a distributed station.
VLAN/VPN Solution
The most secure way for remote networking is to rely on a VLAN (virtual LAN) software. There are several available such as:
Hamachi https://www.vpn.net/
FreeLan http://www.freelan.org/
Player.me https://player.me/
ZeroTier https://www.zerotier.com/
OpenVPN https://openvpn.net/
Each VLAN solutions have their own particular set up which is covered in their respective documentations.
With a VLAN solution, all DXLog configurations are the same as when operating in a regular LAN however with a few exceptions.
One weakness with connections over the internet (a.k.a. WAN), including VLAN solutions, is that they are prone to packet loss.
Packet loss is disastrous to DXLog's (or any logger's) standard UDP networking.
It is therefore essential to use only client/server networking over a VLAN.
This also means you should never use interlock over an internet connection.
Hamachi is particularly popular since it is free for up to five computers. Thanks to the communications
architecture of DXLog, this translates into up to five geographical locations.
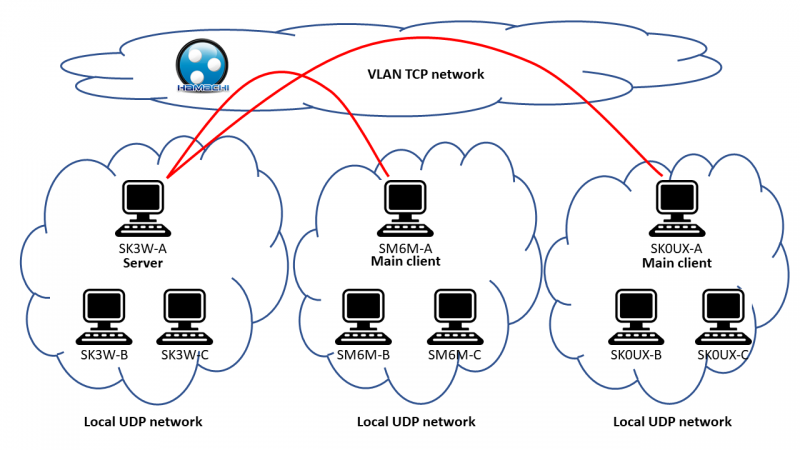
Since DXLog is able to mix TCP and UDP networking, a distributed station set up should be configured to rely on TCP
for the wide-area network and UDP for the local network at each station location. Below you will find the station
set up for the Swedish HQ station SE9HQ in the 2019 IARU HF Championship. The DXLog.net.DXC cluster client was run
on SK3W-A which distributed spots to all stations over the network. Inband interlock was also used at the SK3W location.
Important to note:
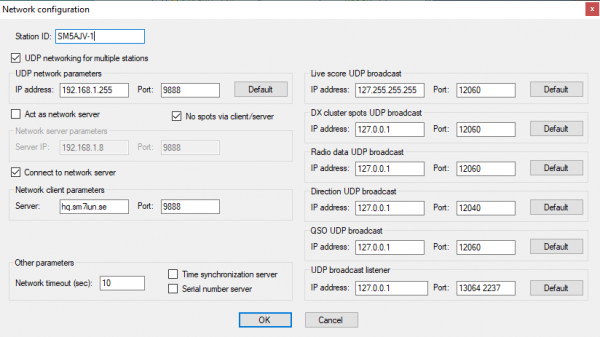
- For the server as well as the main clients, Server IP should be set to the server's VLAN IP address, not its LAN address.
- The server should check both "Act as network server" and "UDP network broadcast for multiple stations".
- The main clients should check both "Connect to network client" and "UDP network broadcast for multiple stations".
- The sub clients should check only "UDP networking for multiple stations".
- Interlock (which is UDP-based) over VLAN does not work reliably because of packet loss.
- Therefore, it is important to configure any interlock to only consider relevant operating positions,
- which all must be local. Use the possibility to only consider named stations for the interlock in the software
- interlock set up.
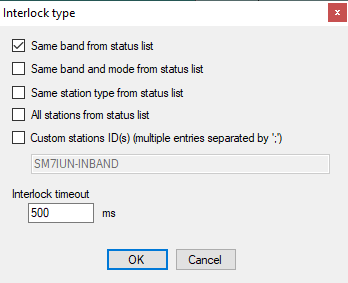
Options|Networking|Software interlock"Custom station ID(s)"
- For a large set-up with many stations connecting as clients to a central server you may overload the server if you also
- distribute spots via all client-server connections. In this case, check the "No spots via client/server" option
- on all stations and use local DX cluster connections via UDP at each location.
- Make sure to check
Options->Load contest at startupto avoid opening the wrong log after a restart. - Remote commands are not forwarded in the network but are executed in the station where they arrive.
- Thus, to clear all logs, disconnect networking on each main client, execute the remote command CLEARLOGNOW
- to clear the logs of all sub clients and do not reconnect until the server and all main clients have done the same.
Port forwarding Solution
If you are less worried about competitors or government agencies listening in on your contest data,
it is possible to route the traffic directly over the internet using port forwarding at the server.
Important security notice: This solution is not without risk. It offers no security or authentication.
Any DXLog station running the same contest configuration, knowing the URL or IP address and IP port of the
server can connect to the server station. There are no means to disconnect a station by force.
Also note the comment about remote commands in the section above.
With a port forwarding solution, the following must be observed:
- Server configuration
- Only one of the stations should be configured as the server.
- "Connect to network server" should not be checked on this station and "UDP networking for multiple stations"
- should only be enabled if it is used to communicate with a cluster client or other stations locally on the same LAN.
- Either use a central cluster connection (uncheck "No spots via client/server") or use one cluster connection per station
- location (check "No spots via client/server"). If one cluster connection per station location is used, make sure they
- all use different SSID to prevent disconnects, such as SK3W-1, SK3W-2, etc.
- The PC acting as server must be configured for a fixed LAN IP address. This is done
- either by manually configuring the networking settings in the PC to use a fixed
- LAN IP address, or by setting up the router in the server's LAN to to always allocate
- the same IP address to it.
- The internet connection used by the server PC must either have a fixed public IP address or
- use dynamic DNS. Otherwise clients will not be able to reliable connect over the internet.
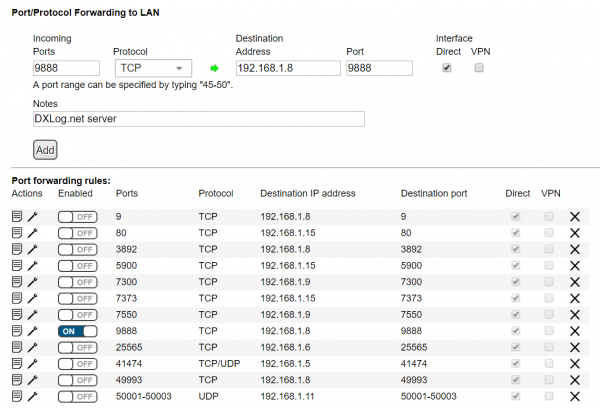
- The server's TCP/IP port (default
9888) must be forwarded to the internet by configuring
- the router connecting the server's LAN to internet. Only TCP traffic should be forwarded.
- DXLog UDP traffic is not carried well over the internet.
- All other stations
- All other PC in the multi-station set up should be set up as clients.
- Over the internet, "Server:" is either the static, public IP address of the server's internet
- connection (e.g.
5.140.211.42) or the dynamic DNS address (e.g.hq.sm7iun.se). - Clients connecting over the internet does not have to enable UDP networking and should not
- enable a server.
- A client may connect via UDP if it is on the same LAN as the server or a so called "master client".
- A "master client" is a client that connects to the server using the "Connect to network server" option in
- the networking set up panel. A "master client" can act as a UDP gateway which means that if
- several computers on a LAN are part of the same multi station set up but the server is located
- elsewhere, only one computer in that LAN needs to connect as a client and the rest can use UDP.
- Software interlock is UDP-based and can only reliably be used locally. Never over the internet.
- If used, make sure the interlock is only active for local stations. See above for more details.
- In a multi-station setting it is recommended to enable
Options|Networking|Don't allow QSO logging if operator isn't logged
- Make sure
Options|Enable networkis checked. - It is also a good idea to check
Options|Load contest at startupto reduce the
- risk of the wrong contest log file being loaded by any stations.
Real time upload to Club Log Live Stream
DXLogStream
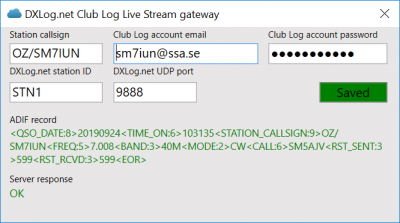
DXLogStream is a basic Windows utility (which can run minimized) that uses the radio information broadcast over
UDP from DXLog and uploads logged QSO to Club Log for display using its Live Stream feature. Typical use cases
are DXPeditions, IOTA activation, Special event stations, etc.
The utility requires a valid Club Log account with the used station call sign registered.
Please note that passwords containing non-ASCII characters may not work due to coding limitations.
Networking must be enabled with Options|Enable Network.
Also, UDP networking must be enabled and the station ID and used port must be the same as
set in the Options|Configure network panel.
Settings are saved by hitting ENTER or clicking the Save button. If the UDP port is changed,
the utility needs to be restarted.
The station callsign entered into the text box is the one used for upload. DXLog does not convey this as
part of the logging information via UDP which means that the corresponding setting in DXLog's contest
configuration is ignored.
The utility can be downloaded here.
You will find more information about the Club Log Live Stream feature on the Club Log web site.
Club Log Gateway
Since the release of the utility above, Michael Wall, G7VJR, the founder of Club Log, has developed a much
more powerful agent for real time uploads. It works with all the three major loggers, DXLog, N1MM Logger+,
and Win-Test.
Unlike the utility above, which is using DXLog's multi-station networking, it can also use
N1MM style UDP XML broadcast of QSO information.
This is enabled by checking Options|Broadcast|QSO the address/port settings are found in the
right half of DXLog's network configuration panel.
The Club Log Gateway can either listen to DXLog's native multi-station networking protocol or to the N1MM style broadcast.
It is less user friendly and more demanding to set up. But for serious use, this is the preferred agent.
You can find more information about it here
Diversity reception
Diversity means receiving the same signal through two different receive chains, including antenna.
With two antennas having different characteristics this can give substantial benefits in receiving
fading and/or weak signals or separating calls in a large pile-up. Particularly on low bands.
DXLog supports diversity operation on a selected number of radio models.
For the supported radios, diversity operation can be toggled on and off using [Ctrl][-] or [Ctrl][Keypad -].
If enabled via the radio's controls, DXLog will automatically detect diversity operation and enable
the necessary mechanics. Diversity operation is indicated by a small DIV icon in the frequency
counter box for the radio's band map.
Yaesu FTDX101D
Yaesu calls this feature "Sync" and it has a dedicated button up and left of the main VFO knob.
Enabling this will make DXLog update both VFO with the same information when grabbing spots.
It will also adjust the sub VFO with the correct amount when RIT is applied to the main VFO.
Since both VFO are kept on the same frequency, split operation is not supported.
ICOM IC-7851 and IC-7610
ICOM calls this feature "Tracking" and it can be enabled either via a menu entry or a long press on the "MAIN/SUB" button.
Enabling this will make DXLog update both VFO with the same information when grabbing spots.
It will also adjust the sub VFO with the correct amount when RIT is applied to the main VFO.
Since both VFO are kept on the same frequency, split operation is not supported.
Elecraft K3/K3S/K4
Elecraft calls this feature by its proper name. It is enabled by a long press on the "Sub" button.
It should be noted that Elecraft's implementation where the main VFO controls both the main and
sub receivers allows for split operation, i.e. transmitting on a different frequency using VFO B.
UDP broadcast
For interaction with other applications, DXLog can broadcast useful information as
XML datagrams over UDP.
There are five types of broadcast messages produced by DXLog:
- QSO information. Sent when logging.
- Radio information. Sent at changes as well as periodically.
- Antenna direction information. Sent when rotor control is invoked.
- Callsign look-up information
- Spots
QSO can be broadcasted in traditional DXLog format or in a more N1MM-like format.
Radio information can report SO2V as a single physical radio or as two physical radios, like N1MM.
There is an option to truncate the broadcasted QSO time to full minutes for better
interoperability with some online services and software such as MSHV.
In addition, DXLog can also recognize QSY commands from Waterfall Bandmap and create
local spots from decodes broadcasted by WSJT-X and its forks.
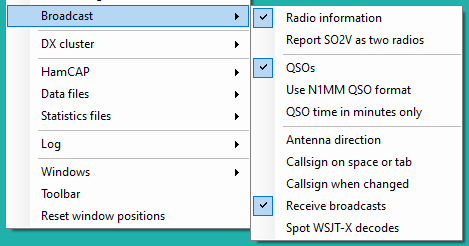
The broadcasting of QSO and radio related data is enabled using the Options|Broadcast submenu.
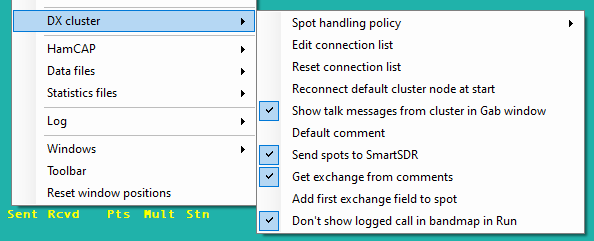
The broadcasting of spots is enabled by checking Options|DX Cluster|Send spots to SmartSDR.
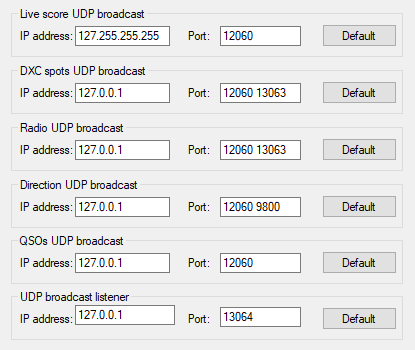
UDP broadcast parameters are configured in the Options|Network configuration panel.
Please note that up to three ports can be specified for each broadcast, thereby supporting
multiple receivers of the information.
If you are writing a C# application to make use of these datagrams, there is a very nice online tool
for creating an object from a sample XML datagram here https://xmltocsharp.azurewebsites.net/
In C# parsing is easily done using Linq. One example of XML parsing and deserialization using Linq
can be found here https://github.com/bjornekelund/ICOMautomagic
QSO information
| Keyword | Meaning |
| logger | The name and version of the logging program |
| qsoid | A unique string for this QSO. If this QSO is edited another contactinfo message will be sent with the same qsoid. Note that the qsoid is only unique within one instance of DXLog. If the computer is networked to others running DXLog the different computers may have a different qsoid for the same QSO. |
| contestname | The name of the contest as it would be written to a Cabrillo file. |
| timestamp | The UTC date and time of the QSO. |
| mycall | The callsign of this station. |
| band | The band on which the QSO was made. In MHz with period as decimal separator. |
| txfreq | The frequency on which the QSO was made. |
| operator | The callsign of the operator if the OPON command was used to set it, otherwise blank. |
| mode | The mode used for the QSO. |
| call | The callsign of the station worked. |
| countryprefix | The DXCC country of the station worked. |
| wpxprefix | The WPX prefix of the station worked. |
| snt | The RST sent. This is always included whether or not the contest exchange contains an RST. |
| rcv | The RST received. This is always included whether or not the contest exchange contains an RST. |
| nr | The number sent if the exchange uses a serial number, otherwise the QSO number from this station. |
| exch1 | The first element in the contest exchange if any. |
| exch2 | The second element in the contest exchange if any. |
| exch3 | The third element in the contest exchange if any. |
| exch4 | The fourth element in the contest exchange if any. |
| xqso | True if this QSO should not be counted towards the score. |
| invalid | True if this QSO is invalid, for example a DX QSO in a domestic contest. |
| duplicate | True if this QSO is a dupe (the station has previously been worked). |
| rule10broken | True if this QSO breaks the 10 minute or similar rule. Note that a QSO may not break the 10 minute rule when it is logged but may later if another QSO is edited. This may not cause a broadcast. |
| azimuth | The approximate direction of the station worked, in degrees. |
| distance | The approximate distance of the station worked, in kilometers. |
| stationid | The station ID of the station which made the QSO. |
| stationqso | A unique QSO ID generated by the logging station. The combination of stationid and stationqso forms a unique identifier for the QSO. |
| stationtype | The type of station - R for run, R1 for run 1 etc. |
| local | True if this broadcast is due to this QSO being logged or edited on this computer. |
| mult1 | The name of the multiplier if this station is a new multipllier, blank otherwise. |
| mult2 | The name of the multiplier if this station is a new multiplier, blank otherwise. |
| mult3 | The name of the multiplier if this station is a new multiplier, blank otherwise. |
| points | The logged points for the QSO. |
| period | The number of the operating period. |
| guid | The GUID in hex format. |
| newqso | True if a new QSO, False if this message is an update to an existing QSO. |
Example message:
<?xml version="1.0" encoding="utf-8"?>
<contactinfo>
    <logger>DXLog v2.4.13</logger>
    <qsoid>19</qsoid>
    <contestname>ARRL-SS-CW</contestname>
    <timestamp>2020-01-13 18:28:07</timestamp>
    <mycall>SM7IUN</mycall>
    <band>3.5</band>
    <txfreq>352376</txfreq>
    <operator></operator>
    <mode>CW</mode>
    <call>K4BAI</call>
    <countryprefix>K</countryprefix>
    <wpxprefix>K4</wpxprefix>
    <snt>599</snt>
    <rcv>599</rcv>
    <nr>19</nr>
    <exch1>076</exch1>
    <exch2>B</exch2>
    <exch3>54</exch3>
    <exch4>GA</exch4>
    <xqso>False</xqso>
    <invalid>False</invalid>
    <duplicate>False</duplicate>
    <rule10broken>False</rule10broken>
    <azimuth>225</azimuth>
    <distance>1388</distance>
    <stationid>STN1</stationid>
    <stationqso>19</stationqso>
    <stationtype>R1</stationtype>
    <local>True</local>
    <mult1>GA</mult1>
    <mult2></mult2>
    <mult3></mult3>
    <points>3</points>
    <period>1</period>
    <guid>11223344556677889900aabbccddeeff</newqso>
    <newqso>True</newqso>
</contactinfo>
Alternative N1MM format
Note that the band name uses the computer's local number format so it may use either comma
or period as decimal separator. The ID is a number rather than an alphanumeric string.
<?xml version="1.0" encoding="utf-8"?>
<contactinfo>
    <app>N1MM</app>
    <contestname>CWOps</contestname>
    <timestamp>2020-01-17 16:43:38</timestamp>
    <mycall>SM7IUN</mycall>
    <band>3.5</band>
    <rxfreq>352519</rxfreq>
    <txfreq>352519</txfreq>
    <operator></operator>
    <mode>CW</mode>
    <call>K1XM</call>
    <countryprefix>K</countryprefix>
    <wpxprefix>K1</wpxprefix>
    <stationprefix>K1XM</stationprefix>
    <continent>NA</continent>
    <snt>599</snt>
    <sntnr>5</sntnr>
    <rcv>599</rcv>
    <misctext></misctext>
    <ismultiplier1>1</ismultiplier1>
    <ismultiplier2>0</ismultiplier2>
    <ismultiplier3>0</ismultiplier3>
    <points>l</points>
    <radionr>l</radionr>
    <run1run2>1<run1run2>
    <IsOriginal>False</IsOriginal>
    <NetBiosName>DESKTOP-23AB</NetBiosName>
    <IsRunQSO>0</IsRunQSO>
    <StationName>STATION_B</StationName>
    <ID>23</ID>
    <IsClaimedQso>true</IsClaimedQso>
</contactinfo>
Radio information
| Keyword | Meaning |
| logger | The name and version of the logging program. |
| Station | The ID of the station. |
| RadioNr | The radio being described. |
| Freq | The receiving frequency. |
| TXFreq | The transmitting frequency |
| InactiveFreq | The frequency of the VFO not receiving. |
| Mode | The reported radio's mode. |
| OpCall | The callsign of the operator if the OPON command was used to set it, otherwise blank. |
| IsRunning | "True" if the station is running, "False" if search and pounce. |
| FocusEntry | The Windows handle for the focused entry window. |
| Antenna | Antenna number. |
| Rotors | Rotators used by selected antenna (not currently used by DXLog). |
| FocusRadioNr | The radio which has keyboard focus. In SO2V with "Report SO2V as two radios" checked, radio 2 is the sub/B VFO. |
| IsStereo | True if headphones are listening to two radios. |
| ActiveRadioNr | The radio which is transmitting, if any. |
| Technique | SO1R, SO2R, SO2R_ADV, or SO2V |
| StationType | Station role: R, M, R1, R2, or R+. |
| isTransmitting | True if a DXLog is transmitting. False if DXLog is not aware of transmission. |
| IFFrequency | Optional element. Only used with Elecraft K3/K4. Contains the current IF frequency in Hz. |
Important note: In SO2V the format differs from some other loggers and is:
- Only physical radio 1 is reported.
- Freq and TXFreq are the frequency of the currently focused VFO.
- InactiveFreq is the frequency of the currently unfocused VFO.
- ActiveRadio is always 1.
- FocusedRadioNr is 1 when the main/A VFO is focused, 2 otherwise.
- IsSplit is always false.
With the option "Report SO2V as two radios" checked, the reporting is similar to some other loggers and is:
- The two VFO are reported as two physical radios.
- Freq and TXFreq for radio 1 are the frequency of the main/A VFO.
- Freq and TXFreq for radio 2 are the frequency of the sub/B VFO.
- InactiveFreq is the frequency of the other VFO.
- ActiveRadio and FocusedRadioNr are 1 when the main/A VFO is focused, 2 otherwise.
- IsSplit is always false.
Example message:
<?xml version="1.0" encoding="utf-8"?>
<RadioInfo>
    <logger>DXLog v2.4.13</logger>
    <Station>STN1</Station>
    <RadioNr>1</RadioNr>
    <Freq>704000</Freq>
    <TXFreq>704000</TXFreq>
    <InactiveFreq>702500</InactiveFreq>
    <Mode>CW</Mode>
    <OpCall>K1XM</OpCall>
    <IsRunning>False</IsRunning>
    <FocusEntry>591124</FocusEntry>
    <Antenna>1</Antenna>
    <Rotors>ABC</Rotors>
    <FocusRadioNr>1</FocusRadioNr>
    <IsStereo>False</IsStereo>
    <Technique>SO1R</Technique>
    <IsTransmitting>False</IsTransmitting>
</RadioInfo>
Antenna direction
| Keyword | Meaning |
| logger | The name and version of the logging program. |
| station | The ID of the station. |
| radio | The radio associated with the rotator. |
| go | True if the rotator should be turned. |
| stop | True if the rotator should be stopped if it is turning. |
| azimuth | The direction to turn the rotator if go is True. |
| frequency | The transmit frequency of the specified radio. |
Example message:
<?xml version="1.0" encoding="utf-8"?>
<Rotator>
    <logger>DXLog v2.4.13</logger>
    <station>STN1</station>
    <radio>2</radio>
    <go>True</go>
    <azimuth>252</azimuth>
    <frequency>2800200</frequency>
</Rotator>
<?xml version="1.0" encoding="utf-8"?>
<Rotator>
    <logger>DXLog v2.4.13</logger>
    <station>STN1</station>
    <radio>2</radio>
    <stop>True</stop>
    <frequency>2800200</frequency>
</Rotator>
Callsign lookup
Sent either when callsign in entry row is changed or when space or tab is pressed.
| Keyword | Meaning |
| logger | The name and version of the logging program. |
| contestname | The name of the contest. |
| mycall | Station's call |
| band | Current band |
| txfreq | Transmitter frequency |
| operator | The call sign of the logged in operator |
| mode | Operating mode |
| call | Call entered in the logging field |
| countryprefix | DXCC entity prefix |
| wpxprefix | WPX prefix |
| azimuth | Short path antenna direction |
| distance | Distance in km |
| stationid | The ID of the station sending the datagram |
| stationtype | The role of the station sending the datagram; R, R1, R2, M, or R+ |
| period | Contest period |
| reason | Reason for transmission; SpaceOrTab or CallChanged |
Example message:
<?xml version = "1.0"?>
<lookupinfo>
	<logger>DXLog v2.4.20</logger>
	<contestname>DARC-WAEDC-CW</contestname>
	<mycall>K1XM</mycall>
	<band>20</band>
	<txfreq>1400200</txfreq>
	<operator></operator>
	<mode>CW</mode>
	<call>E7DX</call>
	<countryprefix>E7</countryprefix>
	<wpxprefix>E7</wpxprefix>
	<azimuth>54</azimuth>
	<distance>6824</distance>
	<stationid></stationid>
	<stationtype>R</stationtype>
	<period>1</period>
	<reason>SpaceOrTab</reason>
</lookupinfo>
Spot
Sent for every incoming spot from the DX cluster that is valid for the current contest.
| Keyword | Meaning |
| app | Application sending the message. |
| StationName | The station issuing the broadcast. |
| dxcall | The callsign of the spotted station. |
| frequency | Frequency in kHz with decimal sign of the PC's current locale. (sic) |
| spottercall | The callsign of the spotter. Station name if locally spotted or result of a logging operation. |
| comment | The comment section of the spot. |
| action | add or delete. |
| status | Spot status. Valid values are "dupe", "double mult", "single mult", and "new qso". |
| statuslist | Same as status |
| timestamp | Spot time in format yyyy-MM-dd HH:mm:ss |
Example message:
<?xml version="1.0" encoding="utf-8"?>
<spot>
    <app>DXLog.net</app>
    <StationName>CONTEST-PC</StationName>
    <dxcall>E7DX</dxcall>
    <frequency>14022.3</frequency>
    <spottercall>SM7IUN-#</spottercall>
    <comment>CW 31 DB 42 WPM CQ</comment>
    <action>add</action>
    <status>single mult</status>
    <statuslist>single mult</statuslist>
    <timestamp>2O23-07-15 14:29:37</timestamp>
</spot>
Broadcast listener
DXLog also listens for commands over UDP.
Currently only one command is implemented, <radio_setfrequency>, which is a QSY command.
| Keyword | Meaning |
| app | Application sending the command |
| radionr | The radio to be changed. In SO2V radio 2 means VFO B. Optional as of DXLog 2.5.20. |
| frequency | Requested frequency. Both period and comma is accepted as decimal separator. |
| mousebutton | Which mouse button was used to create message, if any. Optional. |
Example message:
<?xml version="1.0" encoding="utf-8"?>
<radio_setfrequency>
    <app>WaterfallBandmap</app>
    <radionr>1</radionr>
    <frequency>21022.194</frequency>
    <mousebutton>Left</mousebutton>
</radio_setfrequency>
SDR integration
HDSDR, OmniRig, and microHAM
Contributed by Ingo SM5AJV/SE5E
Until DXLog offers SDR integration there are still ways to get a waterfall/spectrum display with DXLog.
I have integrated the free SDR software HDSDR with DXLog using
Microham Device Router,
OmniRig
and AutoHotkey.
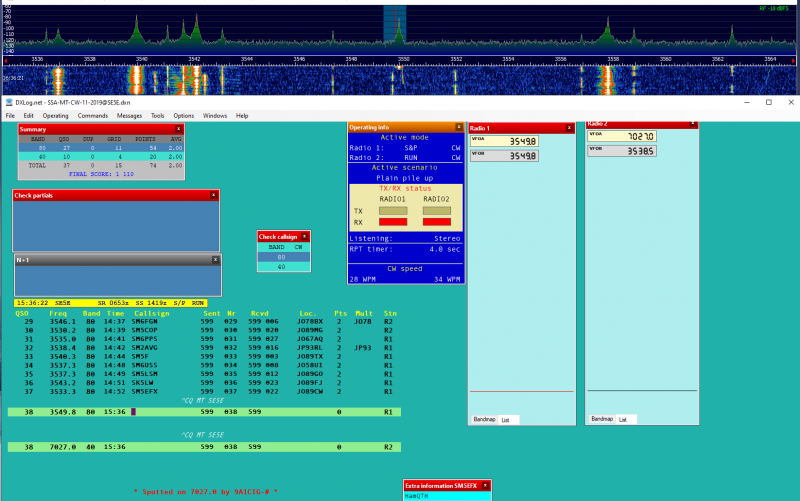
As illustrated below I place the HDSDR window at the very top of the desktop with DXLog right below.
I share my transceiver's (an Elecraft K3) antenna with the SDR. The receiver antenna signal from my
K3's RX-ANT OUT is connected to the input of a 3dB power splitter. The two outputs from the splitter
are connected RX-ANT IN on the K3 and the SDR Receiver antenna input, respectively. On a K3 you
need to enable the RX-antenna input to make this to work. An additional benefit with this method
is that the SDR is protected during transmission. It is a widely used method and is e.g. described
by Bob N6TV in this
presentation.
Screenshot of my desktop:
Since both DXLog and HDSDR need to communicate with the radio, you need to "split"
the CAT communication. microHAM's USB Device Router provides a second, independent,
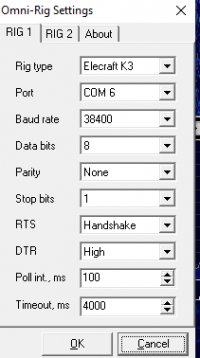
CAT port that can be used via HDSDR's omniRig interface.
"PORT" Tab on microHamRouter:
OmniRig settings in HDSDR:
With this set up, the radio, DxLog, and HDSDR will be fully synchronized. For instance, you can
click in the waterfall to make the radio QSY, and it is easy to quickly find a clean frequency.
To make the integration even better I use a small AutoHotkey script. The script pulls entry focus
back to DxLog after clicking on the HDSDR waterfall and in DXLog it allows you to use hotkeys to
control HDSDR. [Ctrl][Alt]+ and [Ctrl][Alt]- zooms the waterfall/spectrum
in and out, and [Ctrl][Alt]C centers it.
AutoHotkey script:
 SetTitleMatchMode, 2
 #InstallKeybdHook
 #IfWinActive, HDSDR
 {
 F4:: return ; disable F4
 ~LButton Up::
   sleep, 1
   Winactivate, DXLog
 return
 }
 #IfWinActive, DXLog
 {
 ^!+:: ControlSend ,, ^{+}, HDSDR
 ^!-:: ControlSend ,, ^{-}, HDSDR
 ^!c:: ControlSend ,, {c}, HDSDR
 }
The script can be downloaded here.
If you start two instances of HDSDR with two different SDR you can even have two waterfalls
running at the same time.
I have not yet found a way to display cluster spots in the HDSDR spectrum panel.
But I still find it very useful to check band activity and it allows me to easily find
a new Run frequency on a crowded band.
Waterfall Bandmap
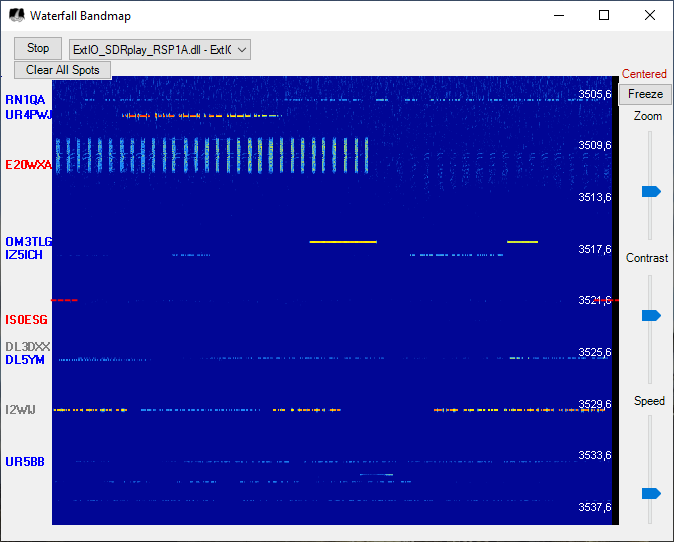
The free waterfall/spot display utility "Waterfall Bandmap" by Steve N2IC is supported by DXLog.
Waterfall Bandmap supports almost any SDR that produce I/Q output either via ExtIO.DLL or a
sound card; SDRPlay, FunCubeProPlus, HackRF, SDR-IQ, RTLSDR, SoftRock, etc.
A zip file with an executable binary and a Microsoft word document with installation and
configuration instructions can be found here: https://groups.io/g/waterfallbandmap/files
If you are not a member of the support forum group, you need to apply for membership to download.
Membership is free.
The SDR can be connected either to a separate receive antenna, an external receiver output on
your transceiver or to an IF output, should your transceiver have one. If connected to an antenna,
keep in mind that you may need protection from the transmitter such as a T/R relay or a passive level limiter.
Please refer to Waterfall Bandmap's documentation for setting it up with your SDR.
Waterfall Bandmap needs two information feeds over UDP: Radio information and spot information.
Both are provided as UDP broadcast by DXLog.
The default port for both is 13063 and this needs to be set in DXLog's Network configuration panel.
If Waterfall Bandmap runs on the same computer as DXLog, the broadcast address can be left at the default 127.0.0.1.
Clicking on the waterfall display can set the frequency of DXLog. (Left click sets VFO A, right click sets VFO B.)
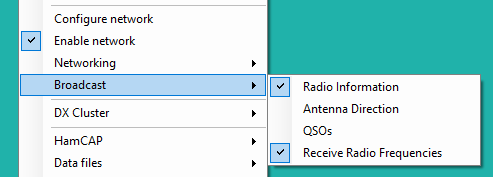
To enable this functionality, check the option Options|Broadcast|Receive Broadcasts
Also make sure "UDP broadcast listener" includes port 13064 in the network settings panel.
The radio information feed needs to be enabled by checking the Options|Broadcast|Radio information option
and the spot feed needs to be enabled by checking the Options|DX Cluster|Send spots to SmartSDR option.
Time synchronization
In a multi-station setting, the time needs to be accurately synchronized across all networked PC.
Windows' built in time synchronization is very crude and for a PC with poor clock stability the
inaccuracy of the clock may be up to a minute. Which of course is not acceptable for contesting.
DXLog has built in support for time synchronization as described in the Configure network section.
Due to Windows' security system, this however requires all except the PC running as time server to
run DXLog with elevated permissions. There is unfortunately no way around this inconvenience.
An equally accurate and less intrusive method is to use a standalone time synchronization application on each networked PC.
This will keep each PC's clock accurate within a fraction of a second.
Contrary to a solution built into a logger it also has the great benefit of being an "install and forget" solution.
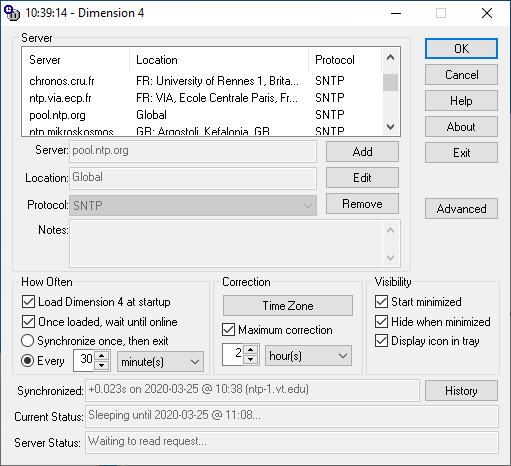
A popular application is Dimension 4 by Thinking Man Software. It is free for personal use and
can be downloaded here: http://dxlog.net/sw/files/utilities/d4time531.msi
It runs in the background and only shows up as a tiny icon in your system tray.
You hover the mouse above the icon to check status and right-click to open and change settings.
After installation a brief configuration is required.
First of all, allow the application to disable Windows' time service and to modify your system clock.
For maximum accuracy, select a time server geographically close to your location.
When in doubt, you can always add the global server "pool.ntp.org" to the list and use that.
There are also national and continental pools of time servers. You can find them here https://www.ntppool.org.
Make sure the check boxes "Load Dimension 4 at startup", "Start minimized", "Hide when minimized",
and "Display icon in tray" are all checked.
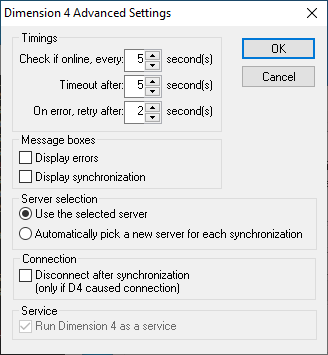
Click the Advanced button and also make sure the option "Use the selected server" is selected.
Make sure the application reports a successful connection to the selected time server.
From here on, you can basically forget the application.
It will silently start with your PC and always keep its time accurate.
Disabling USB power management
In the interest of saving energy, Windows habitually power down USB interfaces
when it believes there is inactivity. Some USB-to-serial and USB audio devices
respond poorly to being suspended or powered down so as a rule this "feature" should
be disabled when used in a ham radio environment.
There are two places where this functionality needs to be disabled; the device driver
and Windows' energy management.
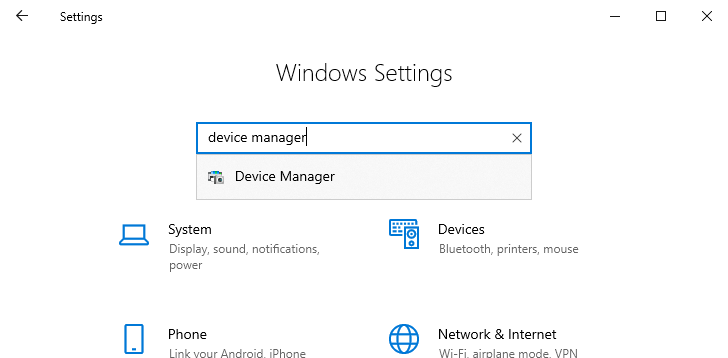
To disable it for each USB interface and device, open Windows settings. (Click the Windows
icon in the lower left corner and then chose the cogwheel.) Type device manager and
select the result.
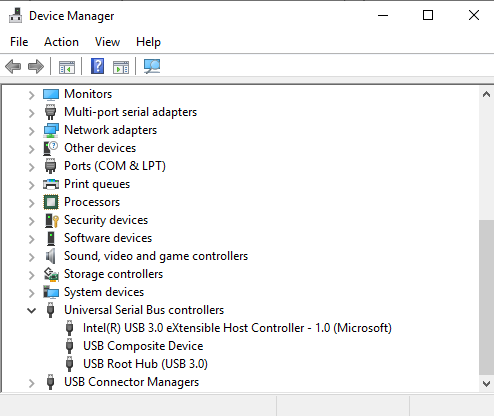
This opens up a new window, Windows' Device Manager.
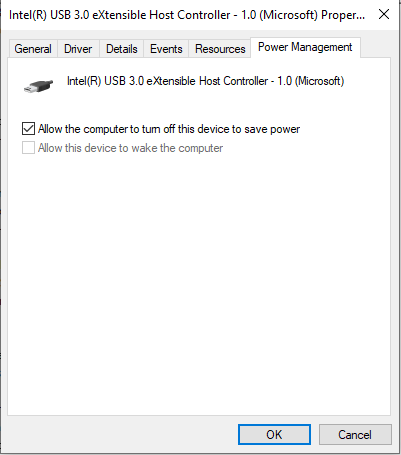
For every USB interface component (there may be many), COM-port, and audio device,
and uncheck the option Allow the computer to turn this device off to save power.
The devices you are looking for are in the categories: Ports (COM & LPT),
Sound, video and game controllers, Universal serial bus controllers,
Note that some devices may not have a Power Management tab.
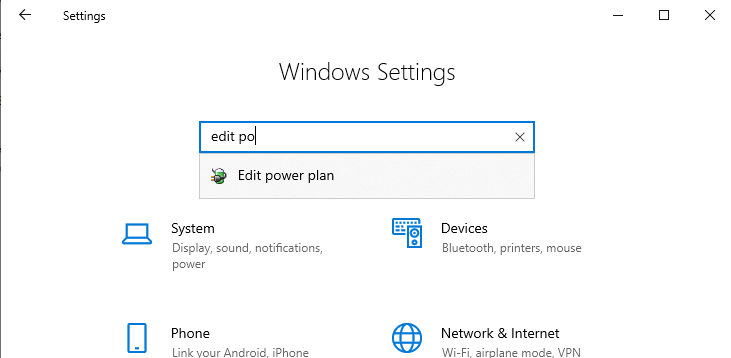
The next step is to disable Windows Selective suspend feature for USB interfaces.
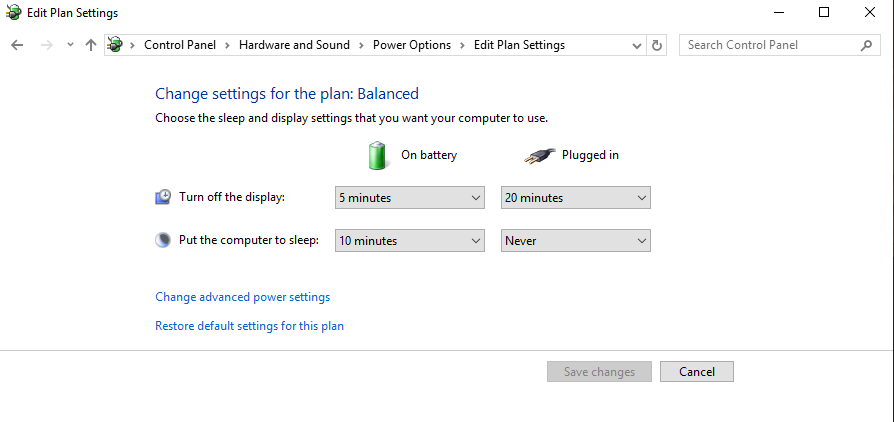
Go back to Windows Settings and type edit power, click the appearing Edit power plan menu entry.
This should open the window below, the plan editing panel.
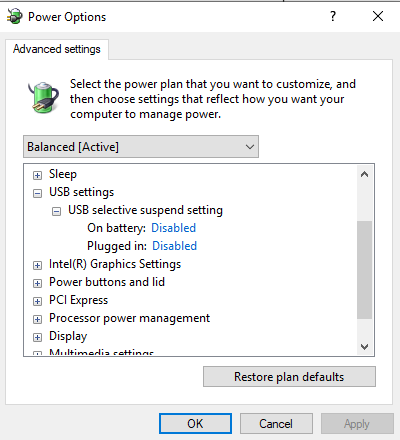
Click Change advanced power settings. Scroll down to USB settings and make
sure USB selective suspend setting is disabled for all situations.
Reboot your computer to make sure all settings are recognized by Windows.
Interlock and inband operation
In contest station terminology, the term Interlock refers to a technical solution preventing
more than one station from using a shared resource, typically an antenna, at the same time.
The most common use for interlock is for inband operation. Inband operation means to have multiple
transmitters on a single band, interleaving their transmissions. Sometimes on a split-second basis.
As long as you never have more than one transmitter active at any time, the majority of contests allow
an unlimited number of transmitters and receivers on a single band for multi-operator categories.
This fact is used by most big contest stations.
For an inband solution to be effective, each station must be able to receive while the
other station transmits. This means it requires a separate, high performance receive antenna
with very good isolation from the transmitter antenna. The most common way to
achieve this is physical separation and geographic orientation to minimize the situations
when they will radiate/listen in the direction of the other antenna.
For a station operating in the M/M, M/S, or M/2 category, inband operation can boost the points
per hour performance significantly. It is also a lot more fun.
However, as with everything else, it comes at a cost. An efficient inband solution has:
- A high performance receive antenna for each operated band(s) with very good isolation from the transmitter antenna.
- A fail-safe antenna switching hardware.
- Interlock-capable keyers and/or station controllers.
- An interlock-capable contest logging software
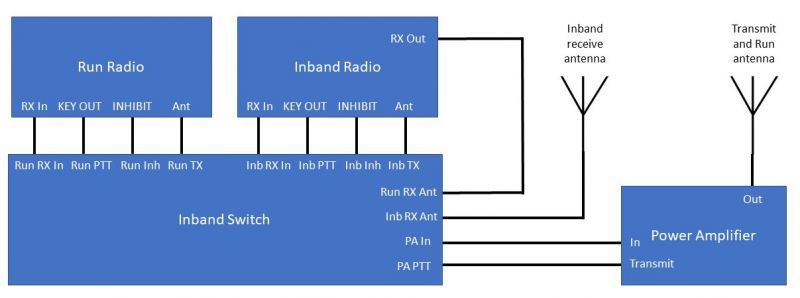
A typical inband configuration can be seen in the illustration below.
DXLog offers a software-based interlock which can be configured in a variety of ways, e.g. based on frequency
band, operating mode, or station role. It supports an unlimited number of stations interlocking each other
using a great variety of strategies.
The interlock relies on UDP networking and is overlaid on the communication for multi-station logging.
UDP networking has the benefit of speed and low latency but is, unlike TCP, susceptible to packet loss.
This means that a wired LAN is strongly recommended for any station set up using interlock.
For the same reason, it is also not recommended to run interlock over e.g. VLAN/VPN link for
geographically distributed stations.
A software interlock is not 100% reliable. Computer or software malfunction, networking issues such as packet
loss, etc. can cause interlock to fail, even if only momentarily.
For this reason it is necessary to also accompany a software interlock with a fail-safe hardware interlock.
Without hardware supported interlock you run the risk of not only violating contest rules but also cause serious equipment damage.
Some contests, such as CQ WW, explicitly requires hardware interlock when using multiple stations on the same band.
There are many designs and even commercial products available for hardware interlock.
One example of a simple but effective two station hardware interlock which also supports
power amplifier sharing can be found HERE.
The purpose of this section is to describe steps of setting up a basic two station in-band solution with
DXLog and microHAM keyers. The microHAM keyers are not mandatory but offers a much better user experience
and removes the need for additional hardware.
Pro tip: Consider checking Options|Networking|Allow other stations to abort sending
which will allow your partner station to interrupt your transmission with [Shift][Esc] in
critical situations. Be careful though, the use of this function requires good judgment to avoid violence.
Networking
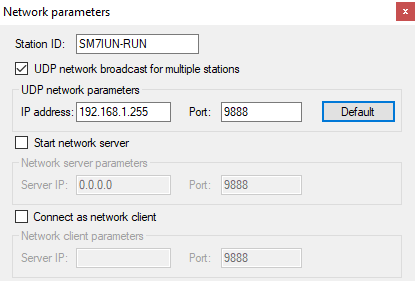
Open the networking configuration panel with Options|Configure network and make sure each
station has a unique name and that only UDP networking is enabled.
Make sure the two stations use the same broadcast IP address and that it is in line with your LAN's
configuration. Pressing the Default button is a good way to ensure this.
Make sure the menu option Options|Enable network has a checkmark.
DXLog Interlock configuration
First of all, make sure that the Options|Interface specific options|Prevent TX if another radio is on same band
is not enabled. This option completely prevents transmission if more than one networked station is set to the same band
and the whole idea with inband is to have exactly that.
Next, activate software interlock on both stations using the menu option Options|Networking|Software interlock
or by typing the commmand ILOCKON.
There are multiple options for configuring the interlock. In a simple set up with only two stations, the topmost
option Same band from status list is a good choice. This option will prevent more than one station transmitting
on the same band, regardless of mode.
In an environment with many stations (such as a multi-operator-multi-transmitter station) it is
recommended to use the bottom option to only interlock with one or several named stations.
This will reduce both LAN traffic and inband operation latency. This is particularly important when
running parts of the DXLog network over high latency links such as VLAN/VPN or if some stations (albeit not
part of the interlock cluster) are connected via Wi-Fi.
For more advanced scenarios you can also use interlock based on mode or station type (e.g. Run 1, Run 2, Mult, etc.).
The "status list" listing the networked DXLog stations is displayed in the Status Window which is opened
with Windows|Status window or [Alt][J].
DXLog also offers great flexibility when it comes to interlock strategy. The most straightforward and
most commonly used is First one wins. This is also typically the behavior of "unintelligent"
hardware solutions when not assisted by software. With this strategy, the station starting to transmit
first can not be interrupted and always gets to finish its transmission.
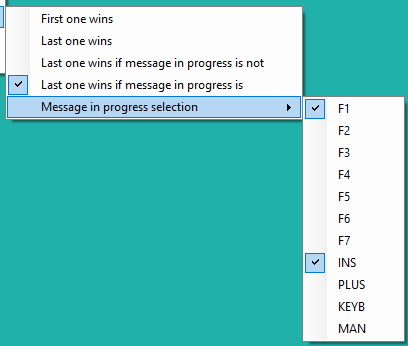
With a Last one wins strategy, the transmitting station can be interrupted. A carte blanche permission
to interrupt all transmissions by the other station may however be counterproductive in a real contest situation.
For this reason, DXLog offers additional control of which transmit actions can be interrupted and which can not.
This is a powerful tool but requires both operators to be aware of it and may require
practice before fully effective.
F1 through F7, PLUS and INS refers to DXLog's standard messages. KEYB means a free text transmission
from the keyboard using the [Alt][K] function and MAN means manual transmission using either paddle
break-in or a footswitch.
For CW, DXLog recognizes paddle break in from a K1EL Winkey-compatible keyer as described in the Winkey configuration section.
Since DXLog recognizes a footswitch connected to a microHAM device, this is a recommended approach for phone.
It is also possible to connect a footswitch to the DSR pin (pin 6) on a physical COM-port on the PC, but today
few PC have such a port and it also requires additional circuitry.
Details on how to do this is available HERE.
microHAM configuration
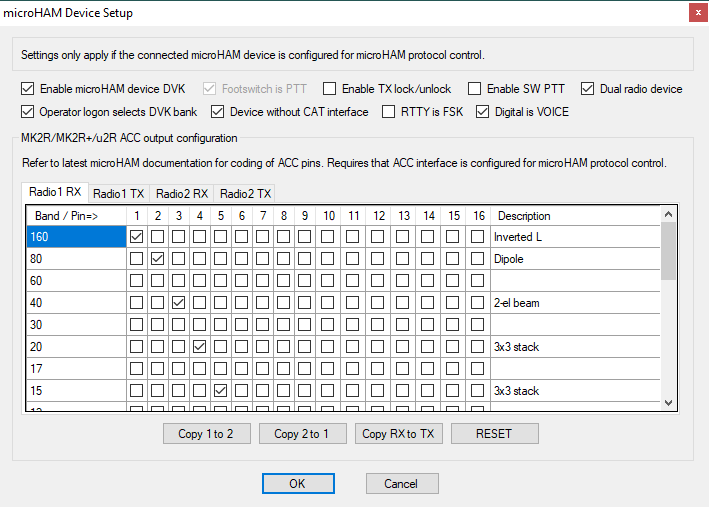
Open the microHAM device configuration panel with Options|microHAM device configuration.
Check the option Enable TX lock/unlock. This will do two things; it will enable DXLog to prevent
transmission and and it will make DXLog aware of the microHAM device's PTT status. The latter is particularly
important since it means DXLog will recognize PTT assertion not only by a footswitch connected to the
microHAM device but also by the built-in Winkeyer (requires microHAM USB Device Router version 9.3.0 or later)
Paddle-based break-in in an inband solution is currently unique for microHAM with DXLog.
Important: Making DXLog "PTT aware" means that care has to be taken in how PTT is set up. If you, for instance,
enable DXLog PTT for the voice keyer, this will create a self-reinforcing feedback loop and PTT will thus never drop.
Check the option Dual radio device if you are using a u2R, MK2R, or MK2R+, otherwise, leave this unchecked.
Check the option Device without CAT interface if the device lacks a CAT interface (like the u2R)
or if its CAT interface is not connected to the radio. This option will make sure the e.g. keying and
audio routing is always set correctly in line with the operating mode (Voice, CW, or RTTY).
Operating
Inband operation requires a fair amount of training and it is a good idea to define and agree
on general rules for operation, such as hand signals for challenging QSO, beforehand.
There are more than enough YouTube videos of inband operators yelling at each other.
The operating tactics may have to be adjusted during the contest. If Run is slow,
doing S&P on the inband station can increase the points per minute significantly.
However, if Run is strong, an overly active inband operator doing S&P, but not working
multipliers, may actually reduce the station's points per minute significantly.
Real-time interlock status is shown in the Radio status window, which is opened with
Windows|Radio status.
For Phone contesting, you typically rely on footswitches for PTT and the option
Options|Networking|Show QSO status when blocking makes the blocking
station send a more helpful blocking cause than MAN.
With this option enabled, the blocking station will instead send CQ, QSO, or EXCHANGE
as blocking cause, determined by cursor location and entry field content at the locking station.
Further reading can be found in the microHAM device configuration and Networking sections.
Connecting a footswitch
To free up both hands in Phone contesting, a footswitch PTT is a great help.
Also, to use interlock in Phone contesting, a footswitch is mandatory.
There are two basic ways to interface a footswitch with DXLog; via a microHAM device (which is the recommended solution)
or directly connected to a physical serial port on the PC (which very few PC have today).
The connection of a footswitch to a microHAM device is very straightforward and by checking the Enable TX lock/unlock
in the microHAM device configuration panel, it is recognized by DXLog.
Lacking a microHAM device, it is also possible to use the computer's DB9 RS-232 serial port connector, providing it has one.
The required steps to do this are:
- Connect a 10k resistor between DB9 pin 6 and pin 7.
- In the port's settings (
Options|Configure interfaces) set DTR (pin 4) to Always On and RTS (pin 7) to Always Off for the port. - Connect the footswitch between DB9 pins 4 and pin 6. Important: Neither pole on the footswitch must be connected to ground.
- In the radio's configuration panel, check use CAT PTT command on Phone and set Footswitch (pin 6) to PTT
Support for CC Cluster
CC Cluster is today the main choice for contest use.
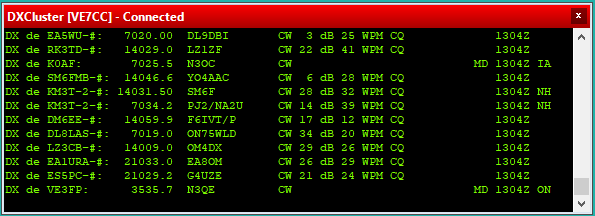
It offers a high quality, database-verified, flow of skimmer spots and a rapid 3-minute respotting period for skimmer spots.
It also publishes unique spots from less common locations which are valuable for DX chasers or as contest multipliers.
To make use of the display of own spot in the world map, make sure to issue the command SET/OWN to the cluster node.
This setting is persistent and only needs to be done once.
A list of cluster nodes that runs CC Cluster can be found here: CC Cluster nodes
A description of the command line syntax can be found here: CC Cluster command syntax
A convenient software for setting up filters etc. can be found here CC User
Support for AR Cluster 6
With the author tragically SK, AR Cluster is no longer under development but still available as an executable binary.
In its standard configuration, AR Cluster offers no consolidation of skimmer spots meaning a very high flow of spots
that can become extreme during a major contest weekend.
With the advent of skimmers, the traffic on the DX Cluster has risen dramatically. Even though CW skimmers are generally
quite reliable, the absolute number of busted spots can be quite high during a busy contest.
Jose CT1BOH has developed an algorithm for evaluating spot quality which is included in version 6 of AR Cluster.
Today many cluster nodes runs this version and thereby offer this mechanic.
A complete list can be found here: AR Cluster nodes
To enable the functionality on a cluster node running AR Cluster 6, the command
SET DX EXTENSION SKIMMERQUALITY
needs to be issued to the cluster node. The easiest way to do this in DXLog is via [Alt][T].
This setting will be remembered at subsequent logins.
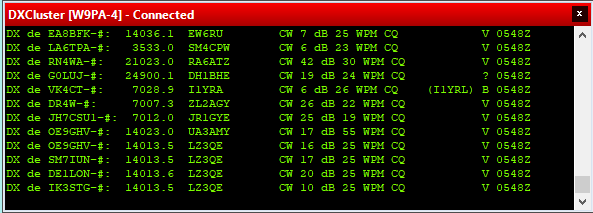
The quality of the spots is indicated by a character ("tag") in the last column of the comment field and,
in some cases, a corrected callsign within parenthesis. This syntax is recognized by DXLog and can reduce the
number of bad spots in your bandmap.
The CT1BOH skimmer quality algorithm is based on three parts:
- Validation
- When a callsign is first spotted, it is tagged with "?" in the last column of the spot's comment field.
If the callsign of an unverified spot closely resembles an already verified one on the same frequency, the verified callsign
is provided within parenthesis in the spot's comment field. When two or more skimmers agree on the spot, it is considered
verified and the tag becomes "V".
- Frequency
- When a verified spot appears more than 0.35kHz off its verified frequency, the spot is tagged "Q" for QSY.
Once verified, this becomes the new verified frequency and it is tagged "V".
- Probability
- The algorithm checks uncertain spots for resemblance with already verified spots and spots at or near the
same frequency. If the resemblance is high enough, the spot is considered busted "B" and the corrected callsign is provided
within parenthesis in the spot's comment field.
Below you can see an example of the spot flow from W9PA-4 with skimmer quality enabled.
The flow contains one unverified and one busted spot.
DXLog's policy for spots with CT1BOH skimmer quality tags is the following:
- V - Accept spot.
- Q - Accept spot.
- ? - Accept spot. Use corrected call when provided.
- B - Accept spot if corrected call provided. Else ignore.
This basic policy can be modified by using additional filters at the cluster node end. Some examples are:
- SET DX FILTER NOT SKIMBUSTED - Do not send busted spots at all
- SET DX FILTER NOT SKIMQSY - Do not send QSY spots
- SET DX FILTER SKIMVALID - Only send verified spots
- SET DX FILTER NOT SKIMUNKNOWN - Do not send unreliable spots
- SET DX FILTER SKIMMER - Do not send manual spots
You can also compose more complex filters such as:
- SET DX FILTER SKIMVALID OR SKIMBUSTED OR NOT SKIMMER
This can be a good filter for most contests. It will will only provide valid or busted skimmer spots together with manual spots.
It is safe to receive busted spots since DXLog will ignore them if there is no corrected callsign included.
For assisted operation in serious contesting you however need to allow also unknown spots since weak stations spotted
only by one or a few skimmers may never reach validated status. You do this by adding OR SKIMUNKNOWN to the filter.
Both the bandmap and the DX cluster announcement windows have the option to display the spot quality tag.
These windows will show two additional tags; L and C. L stands for local spot, created by yourself or one of your team members.
C stands for corrected, i.e., a B or ? spot where a corrected call has been included in the spot's comment field.
The AR6 filtering syntax offers a lot of flexibility. Another example:
- SET DX FILTER (SKIMVALID OR NOT SKIMMER OR ((SKIMQSY OR SKIMUNKNOWN) AND (CTY <> K AND CONT <> EU )))
will provide only validated and human spots except if they are from outside the US and EU.
If you get lost in the filter settings you can always reset with : SET DX DEFAULT.
Some more guidance on how to work with filters on AR-Cluster nodes can be found in this document.
Support for DXSpider
DXSpider is the by far most dominant DX cluster software but has historically not been a good choice for contesters.
The reasons for this include: Long respotting time, lack of pass function for own spots, and suppression of spots from a single skimmer.
The good news is however that the author Dirk G1TLH has worked hard to address these aspects of the otherwise brilliant software.
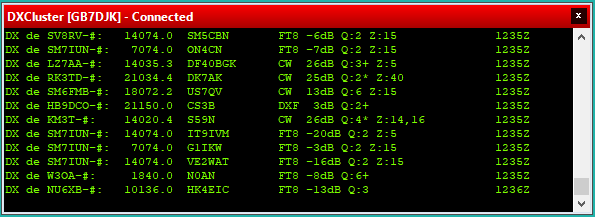
From version 1.57 release 440 the respotting time is now 3 minutes and there is a SET/SEEME command that passes all spots
without consolidation of your own callsign.
So if your favorite cluster node is not running this version, ask the owner to upgrade asap.
Yet another reason for its popularity is its extreme resource-efficiency which allows it to run virtually
any Linux capable hardware, including a $20 Raspberry Pi Zero.
A list of all DX cluster nodes running DX Spider can be found here: DX Spider cluster nodes
DXLog recognizes the Q:# skimmer quality tag in the comment field and converts them into "CT1BOH-like" quality
tags that can be displayed in DXLog's bandmap. The legend is:
- ? means a spot with Q:1, i.e. heard by only one skimmer. This is an unreliable spot.
- U means a spot with Q:2, i.e. heard by only two skimmers. This is a fairly reliable spot.
- V means a spot with Q:3 or higher, i.e. heard by several skimmers. This spot is considered validated.
Since a DXSpider node currently needs to be specially configured by the owner to publish Q:1 spots, very few do this.
Also, since DXSpider lacks busted call detection, the the quality of the spot flow will suffer if this is done.
There is a wealth of information to be found on the DXSpider wiki.
Interacting with WSJT-X
Important: This functionality is of experimental quality and has flaws. Use at your own risk.
Mixing logging from keyboard and WSJT-X at the same time on the same station may have unwanted effects.
Important: When in a DXpedition/multi-station setting, always use local host 127.0.0.1 as the
broadcast address to prevent packets being picked up by other stations in the network.
Also, enabling the creation of local spots from decodes may overflow DXLog.
DXLog can add QSO performed with WSJT-X to its log. Note that this functionality only works
for contests with grid as the first and only exchange or for DXPedition type logs.
DXLog can also create local spots from WSJT-X decodes by checking
Options|Broadcast|Spot WSJT-X decodes.
To enable logging of WSJT-X QSO, set up WSJT-X to broadcast information:
Activate DXLog's UDP listener by checking Options|Broadcast|Receive broadcasts and set
the same port number as in WSTJ-X in DXLog's network configuration panel.
Using Winkey FSK
Winkey FSK is not natively supported by DXLog's digital mode engines MMVARI or MMTTY but
Rafal EI6LA has developed a plugin for MMTTY that makes this possible.
You can find it here.
Interfacing with LogHX
Christian F8GHE has prepared a guide on how to do this.
You can find it here.
Self-spotting
More and more contests allow spotting your own station on the DX cluster.
DXLog supports this, even when operating unassisted, as long as you connect to the cluster.
DXLog has three mechanics for self-spotting.
- The $SPOTME macro command. This macro will create a cluster spot of the station's
- call at the earliest 15 seconds after being invoked the first time on a new frequency.
- Thereafter it will spot as frequent as allowed by the contest. If the contest rules do not
- specify a minimum period, 10 minutes will be used.
- Checking the menu option
Tools|Data entry|Run F1 message self-spots when permitted.
- Works exactly like the $SPOTME macro command but is triggered by sending the
- Run F1 message which happens when pressing
[Enter]with an empty entry line - in Run, pressing
[F1]in Run, or with Auto-CQ.
- Clicking the menu item
Commands|Self-spotor pressing its shortcut key[Ctrl][S].
- This will immediately create a spot of the station's call but no more often than
- every two seconds to avoid accidental multiple spots.
