Difference between revisions of "Menu Operating"
(→Technique) |
(→Left Shift focus opposite radio) |
||
| (168 intermediate revisions by 4 users not shown) | |||
| Line 1: | Line 1: | ||
| − | |||
| − | |||
==Period autoswitch== | ==Period autoswitch== | ||
| − | Some | + | Some contest rules specify that operating must be split into more than one period, periods are defined by a length of time.<br> |
| − | In contest configuration file, it is possible to define | + | In the relevant contest configuration file, it is possible to define the length and number of time periods.<br> |
| − | When this option is activated, DXLog | + | When this option is activated, DXLog automatically switches the contest period to the next one when the current<br> |
| + | active period ends. | ||
==Bandmap== | ==Bandmap== | ||
| − | + | [[image:Operating_bandmap_menu4.png]] | |
| − | < | + | |
| − | <br> | + | <br> |
| + | The [[Menu_Windows#Radio_1|Bandmap window]] contains a graphical representation of a band segment, including spots.<br> | ||
| + | The bandmap window is opened using <code>Windows|Radio 1</code> and <code>Windows|Radio 2</code>. | ||
| + | |||
| + | With spots showing in the bandmap (either manually added in unassisted operation or via a<br> | ||
| + | DX cluster spot feed) the below options are used to handle them. | ||
* Add with SPACEBAR | * Add with SPACEBAR | ||
| − | By default, | + | : By default, spots are added to the bandmap by entering the callsign and pressing <code>[Ctrl][Enter]</code>.<br> |
| − | + | : Depending on the settings in the bandmap's properties panel, the callsign may be cleared or not by this operation. | |
| − | When | + | : When Add with Spacebar is enabled, a manual spot is created when the Spacebar is pressed. The call is not cleared. |
| − | + | ||
| + | * QSY opposite radio instead of 2nd VFO | ||
| + | : When checked, pressing <code>[Ctrl][Alt][Up]</code> and <code>[Ctrl][Alt][Down]</code> will | ||
| + | : move through the bandmap using the opposite radio main VFO (instead of active radio second VFO). | ||
| + | : This setting also affects the function of <code>[Alt][Doubleclick]</code> in the Skeds window. | ||
| + | * Grab the spot on or near frequency | ||
| + | : Shortcut: <code>[Ctrl][Space]</code> | ||
| + | : Grab the spot that is highlighted or nearest to the current frequency. | ||
* Grab first valid upper spot | * Grab first valid upper spot | ||
| − | Shortcut: | + | : Shortcut: <code>[Ctrl][Up]</code> |
| − | + | : Select and grab the first spot above your current location on the bandmap. | |
| + | : Only grabs multipliers if <code>Display options|Multipliers only in list view & grabbing</code> is checked. | ||
| + | * Grab first valid upper spot to 2nd VFO | ||
| + | : Shortcut: <code>[Ctrl][Alt][Up]</code> | ||
| + | : Grab the first valid spot above your 2nd VFO's current location on its bandmap onto your 2nd VFO. | ||
| − | * Grab first upper spot | + | * Grab first valid upper multiplier spot |
| − | Shortcut: | + | : Shortcut: <code>[Ctrl][Shift][Up]</code> |
| − | + | : Select and grab the first multiplier spot above your current location on the bandmap. | |
| − | |||
* Grab first valid lower spot | * Grab first valid lower spot | ||
| − | Shortcut: | + | : Shortcut: <code>[Ctrl][Down]</code> |
| − | + | : Select and grab the first spot below your current location on the bandmap. | |
| + | : Only grabs multipliers if <code>Display options|Multipliers only in list view & grabbing</code> is checked. | ||
| + | * Grab first valid lower spot to 2nd VFO | ||
| + | : Shortcut: <code>[Ctrl][Alt][Down]</code> | ||
| + | : Grab the first valid spot below your 2nd VFO's current location on its bandmap onto your 2nd VFO. | ||
| − | * Grab first | + | * Grab first valid lower multiplier spot |
| − | Shortcut: | + | : Shortcut: <code>[Ctrl][Shift][Down]</code> |
| − | + | : Select and grab the first multiplier spot below your current location on the bandmap. | |
==Technique== | ==Technique== | ||
| − | |||
| − | + | Sets the operating model for DXLog. | |
| − | + | ||
| − | + | The choice controls the availability and function of a large number of features. | |
| − | + | ||
| + | ===SO1R/Multi op=== | ||
| + | |||
| + | Used for single operator with one radio or part of a multi-station setup.<br> | ||
| + | The audio selection options are disabled. Only one entry QSO line is visible. | ||
| + | |||
| + | '''Important:''' SO1R only works for Radio 1 in the <code>Options|Configure interfaces</code> panel. | ||
| + | |||
| + | ===SO2R=== | ||
| + | |||
| + | Used for basic operation with single operator using two radios. | ||
| + | |||
| + | '''Important:''' SO2R requires two radios (Radio 1 and Radio 2) configured in the <code>Options|Configure interfaces</code> panel. | ||
| + | |||
| + | The audio selection options are enabled. Two entry QSO line are visible. | ||
| + | |||
| + | You switch focus using [Up], [Down], or [Keypad *]. | ||
| + | |||
| + | * ''Listen to radio 1'' | ||
| + | : Shortcut: <code>[Ctrl][Alt][A]</code> | ||
| + | : Puts the audio of radio 1 in both ears. | ||
| + | |||
| + | * ''Listen to radio 2'' | ||
| + | : Shortcut: <code>[Ctrl][Alt][T]</code> | ||
| + | : Puts the audio of radio 1 in both ears. | ||
| + | |||
| + | * ''Listen to focused radio'' | ||
| + | : Shortcut: <code>[Ctrl][Alt][L]</code> | ||
| + | : Puts the audio of the currently focused radio in both ears. | ||
| + | |||
| + | * ''Toggle listen to both radios'' | ||
| + | : Shortcut: <code>[Ctrl][Alt][S]</code> | ||
| + | : Alternates between putting the focused radio in both ears and one radio in each ear. (a.k.a. Stereo). | ||
| + | |||
| + | Given the somewhat complex nature of these shortcuts, many redefine other keys (e.g. F-keys) to these. | ||
| + | |||
| + | Using these commands requires an SO2R controller such as SO2R Mini or microHAM MK2R+. | ||
| + | |||
| + | |||
| + | [[File:R1R2.jpg]] | ||
| + | |||
| + | ===Advanced SO2R=== | ||
| + | |||
| + | Used for advanced operation with single operator using two radios. | ||
| + | |||
| + | '''Important:''' Advanced SO2R requires two radios (Radio 1 and Radio 2) configured in the <code>Options|Configure interfaces</code> panel. | ||
| + | |||
| + | The audio selection options are enabled. Two entry QSO line are visible. | ||
| + | |||
| + | Using the audio selection commands requires an SO2R controller such as SO2R Mini or microHAM MK2R+. | ||
| + | |||
| + | A set of special control strings called '''Scenario''' are available.<br> | ||
| + | A scenario is a set of command sequences, one for each function key, that <br> | ||
| + | controls the operating flow, audio paths, transmit and receive focus etc.<br> | ||
| + | The scenarios can be edited using <code>Operting|Edit SO2R scenarios</code>.<br> | ||
| + | Scenarios will work in all operating modes; CW, SSB, and Digital.<br> | ||
| + | Scenarios are only for QSO flow control and do not replace the standard messages in CW and Digital. | ||
| + | |||
| + | One simple example of strings is shown below. | ||
| + | |||
| + | |||
| + | [[File:scenario.png]] | ||
| + | |||
| + | |||
| + | '''Important:'''. Space characters (" ") have no effect in scenario definitions. To insert an actual space, use $BLANK. | ||
| + | |||
| + | '''Important:''' For contests involving serial numbers you need to secure that the sent number and<br> | ||
| + | the logged serial numbers are the same. Since QSO can be interleaved in advanced SO2R,<br> | ||
| + | this requires the use of a common source of serial numbers for both radios and a mechanic<br> | ||
| + | to assign a specific serial number to a started QSO. In DXLog this is done using a number server.<br> | ||
| + | You can find more information on how to configure this [[Additional_Information#Using_a_number_server|here]]. | ||
| + | |||
| + | ===SO2V=== | ||
| + | |||
| + | This operating mode allows you to use the radio's two VFO ''almost'' as if having 2 separate radios. | ||
| + | |||
| + | Important: SO2V only works for Radio 1 in the <code>Options|Configure interfaces</code> panel. | ||
| + | |||
| + | Depending on their CAT command repertoire this is implemented using either VFO selection or swapping<br> | ||
| + | on single receiver radios. Some radios, e.g. FlexRadio and some Yaesu models, will work with either. | ||
| + | |||
| + | For dual receiver radios, the SO2V mechanic based on using SPLIT should be used.<br> | ||
| + | In this case the option <code>Options|Interface specific options|Dual receiver radio (Use split in in SO2V)</code> must be enabled. | ||
| + | |||
| + | On selected radios, such as dual receiver ICOM radios, VFO knob focus will follow DXLog's focus. | ||
| + | |||
| + | On selected radios, sub receiver on/off control is also supported. | ||
| + | |||
| + | In SO2V with SPLIT on such radios, two of the audio control menu entries above<br> | ||
| + | plus two additional shortcut keys are available for sub receiver control. | ||
| + | |||
| + | : <code>[Ctrl][Alt][S]</code> toggles the sub receiver on and off when radio 1 is focused. | ||
| + | : <code>[Ctrl][Alt][D]</code> toggles the sub receiver to be permanently on or switch on and off with focus. | ||
| + | |||
| + | Important: On many keyboards <code>[AltGr]</code> can be used instead of <code>[Ctrl][Alt]</code>. | ||
| + | |||
| + | Although not on the level of SO2R, SO2V can be a quite efficient operating mode.<br> | ||
| + | |||
| + | <b>Tips for the beginner</b> | ||
| + | |||
| + | * Train in receiving with both receivers enabled. | ||
| + | : You will typically have your Run frequency on the main VFO (left ear) and do S&P on the sub VFO (right ear). | ||
| + | |||
| + | * Remap the Toggle subreceivier key to a more accessible key. | ||
| + | : When getting used to SO2V you will find yourself frequently switching the subreceiver on and off | ||
| + | : while focusing the main VFO. Since keyboard layouts vary greatly, a generic key, <code>[Ctrl][Alt][S]</code> | ||
| + | : is assigned to this function. This is also in line with its function in SO2R. | ||
| + | : A popular key to redefine for this is the one directly to the left of "1". | ||
| + | : This is ` on English language keyboards and § on most European ones. | ||
| + | : Use <code>Tools|Redefine keyboard keys</code> to do this. | ||
| + | |||
| + | * Use the "rapid CQ" key. | ||
| + | : In SO2V, <code>[Shift][Ctrl][F1]</code> switches focus to radio 1, shifts to Run, and sends CQ. | ||
| + | : Since it is common practice to Run on the main VFO and S&P on the sub VFO, this is a very convenient key. | ||
| + | : Many redefine <code>[F1]</code> to mean this key. | ||
| + | |||
| + | * Use the "Equalize VFO" key. | ||
| + | : <code>[Ctrl][F4]</code> sets the unselected VFO to the same mode and frequency as the selected VFO. | ||
| + | : This is a very convenient way to synchronize the two VFO when switching band or just doing S&P. | ||
| + | |||
| + | * Use the "Switch focus" key as alternative to <code>[Up]</code> and <code>[Down]</code> | ||
| + | : <code>[Keypad Multiply]</code> toggles transmit and entry focus between the two VFO. | ||
| + | |||
| + | * Use the "Switch VFO knob focus" key. | ||
| + | : <code>[Keypad Divide]</code> switches the VFO knob focus on supported stations (such as recent dual | ||
| + | : receiver ICOM and Yaesu radios) allowing you to tune around the band looking for S&P opportunities | ||
| + | : on the sub VFO while calling CQ, keeping entry and transmit focus on the main VFO. | ||
| + | |||
| + | * Consider using the "Swap VFO" key. | ||
| + | : <code>[Alt][Keypad Multiply]</code> swaps the frequency and mode of the two VFO. | ||
| + | : Since the main VFO is typically the Run VFO, there may be situations when this is helpful. | ||
| + | |||
| + | * Make band shift keys change both VFO | ||
| + | : The option <code>Options|Interface specific options|Band change keys affect both VFO</code> makes | ||
| + | : band changes with <code>[Alt][F1]</code>/<code>[Alt][F2]</code> change the band of both | ||
| + | : the main and the sub VFO in tandem. This saves a lot of key presses and also reduces the | ||
| + | : risk of accidentally transmitting on a band which your PA and antenna is not currently set for. | ||
| + | : For more information on supported radio models, see the [[Radios|Notes on supported radios]] section. | ||
| + | |||
| + | For RTTY with FSK, SO2V represents a particular challenge since two instances of MMTTY will<br> | ||
| + | need to access the same COM-port. This can be solved by either using a wire-or connection<br> | ||
| + | (as described by W0YK at [https://www.contestuniversity.com/wp-content/uploads/2019/05/13-W0YK-Taking-Digital-Contesting-to-the-Limit_2019.pdf 2019 Contest University])<br> | ||
| + | or a port-sharing solution like that included in the microHAM device router. | ||
| + | |||
| + | ==Listen to radio 1== | ||
| + | Shortcut: <code>[Ctrl][Alt][A]</code> <code>[AltGr][A]</code> | ||
| + | |||
| + | Puts the audio of radio 1 in both ears. Not available in SO1R or SO2V. | ||
| + | |||
| + | The audio status is visible in the '''Operating info''' and '''Rate''' windows<br> | ||
| + | and on the entry lines if <code>Options|Log|Show RX status color</code> is enabled. | ||
| − | + | [[File:operating info R1.jpg]] | |
| − | |||
| − | |||
| − | |||
| − | |||
| − | |||
| − | + | ==Listen to radio 2== | |
| − | + | Shortcut: <code>[Ctrl][Alt][T]</code> <code>[AltGr][T]</code> | |
| − | |||
| − | + | Puts the audio of radio 2 in both ears. Not available in SO1R or SO2V. | |
| − | |||
| − | |||
| − | + | The audio status is visible in the ''Operating info'' and ''Rate'' windows<br> | |
| − | + | and on the entry lines if <code>Options|Log|Show RX status color</code> is enabled. | |
| − | |||
| − | + | [[File:operating info R2.jpg]] | |
| − | + | ==Listen to the focused radio== | |
| + | Shortcut: <code>[Ctrl][Alt][L]</code> <code>[AltGr][L]</code> | ||
| − | + | Puts the audio of the focused radio into both ears. | |
| − | + | Not available in SO1R or SO2V. | |
| − | |||
| − | |||
| − | |||
| − | |||
| − | |||
| − | |||
| − | |||
| − | |||
| − | |||
| − | |||
| − | + | ==Toggle listen to both radios== | |
| + | Shortcut: <code>[Ctrl][Alt][S]</code> <code>[AltGr][S]</code> | ||
| − | + | Alternatively puts the audio of the each radio in one ear or the audio of the selected radio in both ears. | |
| − | |||
| − | |||
| − | |||
| − | |||
| − | |||
| − | |||
| − | + | Not available in SO1R. | |
| − | |||
| − | + | The audio status is visible in the '''Operating info''' and '''Rate''' windows<br> | |
| − | < | + | and on the entry lines if <code>Options|Log|Show RX status color</code> is enabled. |
| − | + | This key is particularly useful in SO2V since it offers a temporary override to the state of '''Sub receiver permanently on'''. | |
| − | |||
| − | + | In a typical SO2V scenario you have the subreceiver permanently on and Run on the Main VFO and S&P on the Sub VFO.<br> | |
| − | <br> | + | To be able to better focus on a weak responder on Run you can temporarily disable the subreceiver by pressing <code>[Ctrl][Alt][S]</code>.<br> |
| + | Then, as soon as you change focus, the sub receiver is re-enabled and then stays enabled. | ||
| − | + | For better ergonomics it is customary to map this somewhat awkward key to the key to the left of <code>[1]</code>.<br> | |
| − | + | On English keyboards, this is normally <code>[`]</code> and on European keyboards, this is <code>[§]</code>. | |
| − | |||
| − | |||
| − | + | [[File:operating info R1R2.jpg]] | |
| − | |||
| − | + | ==Sub receiver permanently on== | |
| − | < | + | |
| + | Shortcut: <code>[Ctrl][Alt][D]</code> <code>[AltGr][D]</code> | ||
| + | |||
| + | Only available in SO2V with <code>Options|Interface specific options|Use SPLIT command in SO2V mode</code> enabled and for supported radios. | ||
| + | |||
| + | Please see [[Radios|supported radios]] for more information. | ||
| + | |||
| + | When enabled, the sub receiver is constantly on. When disabled, the sub receiver is only on when logical radio 2 (i.e. the Sub VFO) is focused. | ||
==Edit SO2R Scenarios== | ==Edit SO2R Scenarios== | ||
| + | |||
| + | Scenarios are available for SO2R Advanced and requires an external SO2R controler such as SO2R Mini or microHAM MK2R+. | ||
| + | |||
| + | The purpose of a scenario is to automate the interaction between the two radios.<br> | ||
| + | A number of parameters can be controlled such as receive and transmit focus, audio routing etc. | ||
| + | |||
| + | |||
| + | [[File:scenario2.png]] | ||
| + | |||
| + | |||
| + | The Scenario in the picture above is called "Alternate CQ" and alternatively calls CQ on both radios.<br> | ||
| + | When you press F1 on R1 (primary radio):<br> | ||
| + | Log cursor swaps to R2 call-field line (command $FOCUS2)<br> | ||
| + | Any possible audio choice activated by keyboard is deleted (command $RESET)<br> | ||
| + | RX focus (audio) is switched to R2 on both ears (command $R2R2)<br> | ||
| + | Starts to send message saved on F1 memory i.e. CQ CONTEST (command $F1)<br> | ||
| + | RX focus (audio) is changed to R1 left ear and R2 right ear (command $R1R2)<br> | ||
| + | When F1 memory is completely sent it swaps again log cursor on R1 and starts TX F1 to R2 (command $ALTERNATECQ) | ||
| + | |||
| + | If you have a caller and you start typing the callsign in log, after the CQ on opposite radio is sent, <br> | ||
| + | DXLog recognize the field is populated and stops CQ-ing and gives TX focus to the radio with callsign. <br> | ||
| + | At this moment you can work the station by pressing <code>Insert</code>. | ||
| + | |||
| + | There are a number of predefined scenarios. They can be modified or you can design your own using the below listed macros. | ||
| + | |||
| + | Any macro command can be used in an SO2R scenario but it is recommended to only use control (e.g. $R1R2) and message (e.g. $F1) macros.<br> | ||
| + | All available macro commands can be found in the [[Configuration#Macro_commands_and_special_characters|macro commands section]]. | ||
| + | |||
| + | '''Important:'''. Space characters (" ") have no effect in scenario definitions. To insert an actual space, use $BLANK. | ||
| + | |||
| + | All strings can be edited "on-the-fly" pressing <code>[Shift][Fx]</code> if enabled with <code>Tools|Message editors</code>. | ||
==SO2R scenario selection== | ==SO2R scenario selection== | ||
| + | There are some available scenarios in DXL but you still can make new ones and save them using a specific name.<br> | ||
| + | You can select a tab in scenario editor window and play with it<br> | ||
| + | When you are operating you may need to change scenario according to operative situations.<br> | ||
| + | You can go to menu <code>Operating|SO2R scenario selection</code> and choose one scenario from the pop-up window. | ||
| + | |||
| + | |||
| + | [[File:scenario selection3.png]] | ||
| + | |||
| + | |||
| + | You can also use shortcuts to select the desired scenario using <code>[Ctrl][Alt][#]</code> with # being the number of the desired scenario. | ||
| + | |||
| + | There is also a custom Form DLL for mouse selection of scenario. It can be downloaded here: http://DXLog/sw/files/utilities/DXLogScenarioPanel.dll | ||
| + | |||
| + | The currently chosen scenario is always visible in the '''Operating info''' window. | ||
| + | |||
| + | |||
| + | [[File:operating info.jpg]] | ||
| + | |||
| + | ==Caps Lock focus radio 2== | ||
| + | |||
| + | Activating <code>[Caps Lock]</code> will switch focus to radio 2. Turning off <code>[Caps Lock]</code> will return focus to radio 1. | ||
| + | |||
| + | ==Left Shift focus opposite radio== | ||
| + | |||
| + | Pressing (and holding) the LEFT <code>[Shift]</code> (when using an SO2R technique) will direct keyboard <br> | ||
| + | input to the opposite radio log line. Note that releasing the LEFT <code>[Shift]</code> will return input <br> | ||
| + | to the first radio. | ||
| + | |||
| + | '''Important:''' This function has a lot of limitations. It only works for the F keys. It prevents the use of<br> | ||
| + | functions like on-the-run message edit and keyboard RIT as well as shifted keys like /, ?, and + on European<br> | ||
| + | keyboards. | ||
Latest revision as of 15:47, 12 February 2024
Contents
Period autoswitch
Some contest rules specify that operating must be split into more than one period, periods are defined by a length of time.
In the relevant contest configuration file, it is possible to define the length and number of time periods.
When this option is activated, DXLog automatically switches the contest period to the next one when the current
active period ends.
Bandmap
The Bandmap window contains a graphical representation of a band segment, including spots.
The bandmap window is opened using Windows|Radio 1 and Windows|Radio 2.
With spots showing in the bandmap (either manually added in unassisted operation or via a
DX cluster spot feed) the below options are used to handle them.
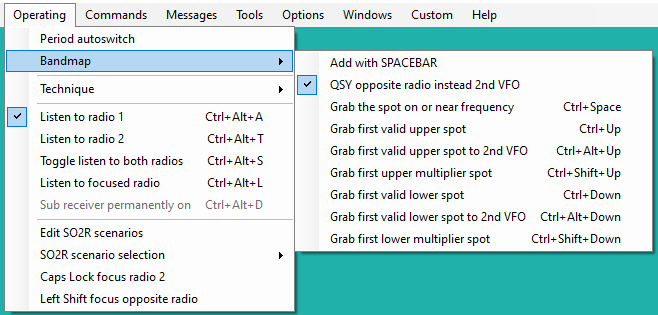
- Add with SPACEBAR
- By default, spots are added to the bandmap by entering the callsign and pressing
[Ctrl][Enter]. - Depending on the settings in the bandmap's properties panel, the callsign may be cleared or not by this operation.
- When Add with Spacebar is enabled, a manual spot is created when the Spacebar is pressed. The call is not cleared.
- QSY opposite radio instead of 2nd VFO
- When checked, pressing
[Ctrl][Alt][Up]and[Ctrl][Alt][Down]will - move through the bandmap using the opposite radio main VFO (instead of active radio second VFO).
- This setting also affects the function of
[Alt][Doubleclick]in the Skeds window.
- Grab the spot on or near frequency
- Shortcut:
[Ctrl][Space] - Grab the spot that is highlighted or nearest to the current frequency.
- Grab first valid upper spot
- Shortcut:
[Ctrl][Up] - Select and grab the first spot above your current location on the bandmap.
- Only grabs multipliers if
Display options|Multipliers only in list view & grabbingis checked.
- Grab first valid upper spot to 2nd VFO
- Shortcut:
[Ctrl][Alt][Up] - Grab the first valid spot above your 2nd VFO's current location on its bandmap onto your 2nd VFO.
- Grab first valid upper multiplier spot
- Shortcut:
[Ctrl][Shift][Up] - Select and grab the first multiplier spot above your current location on the bandmap.
- Grab first valid lower spot
- Shortcut:
[Ctrl][Down] - Select and grab the first spot below your current location on the bandmap.
- Only grabs multipliers if
Display options|Multipliers only in list view & grabbingis checked.
- Grab first valid lower spot to 2nd VFO
- Shortcut:
[Ctrl][Alt][Down] - Grab the first valid spot below your 2nd VFO's current location on its bandmap onto your 2nd VFO.
- Grab first valid lower multiplier spot
- Shortcut:
[Ctrl][Shift][Down] - Select and grab the first multiplier spot below your current location on the bandmap.
Technique
Sets the operating model for DXLog.
The choice controls the availability and function of a large number of features.
SO1R/Multi op
Used for single operator with one radio or part of a multi-station setup.
The audio selection options are disabled. Only one entry QSO line is visible.
Important: SO1R only works for Radio 1 in the Options|Configure interfaces panel.
SO2R
Used for basic operation with single operator using two radios.
Important: SO2R requires two radios (Radio 1 and Radio 2) configured in the Options|Configure interfaces panel.
The audio selection options are enabled. Two entry QSO line are visible.
You switch focus using [Up], [Down], or [Keypad *].
- Listen to radio 1
- Shortcut:
[Ctrl][Alt][A] - Puts the audio of radio 1 in both ears.
- Listen to radio 2
- Shortcut:
[Ctrl][Alt][T] - Puts the audio of radio 1 in both ears.
- Listen to focused radio
- Shortcut:
[Ctrl][Alt][L] - Puts the audio of the currently focused radio in both ears.
- Toggle listen to both radios
- Shortcut:
[Ctrl][Alt][S] - Alternates between putting the focused radio in both ears and one radio in each ear. (a.k.a. Stereo).
Given the somewhat complex nature of these shortcuts, many redefine other keys (e.g. F-keys) to these.
Using these commands requires an SO2R controller such as SO2R Mini or microHAM MK2R+.
Advanced SO2R
Used for advanced operation with single operator using two radios.
Important: Advanced SO2R requires two radios (Radio 1 and Radio 2) configured in the Options|Configure interfaces panel.
The audio selection options are enabled. Two entry QSO line are visible.
Using the audio selection commands requires an SO2R controller such as SO2R Mini or microHAM MK2R+.
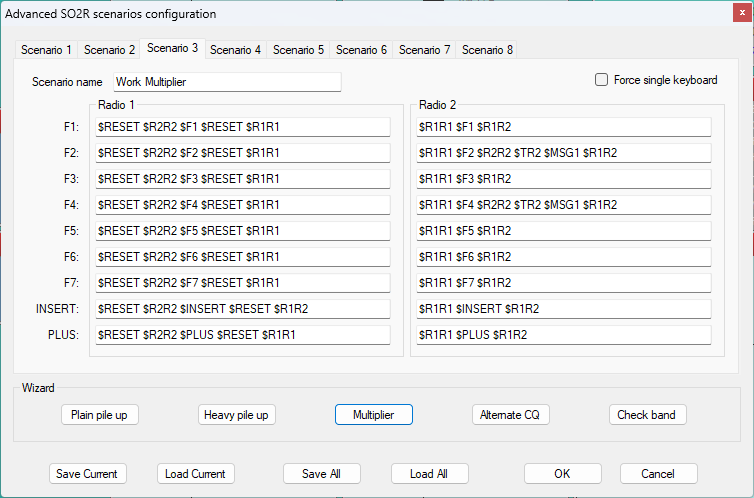
A set of special control strings called Scenario are available.
A scenario is a set of command sequences, one for each function key, that
controls the operating flow, audio paths, transmit and receive focus etc.
The scenarios can be edited using Operting|Edit SO2R scenarios.
Scenarios will work in all operating modes; CW, SSB, and Digital.
Scenarios are only for QSO flow control and do not replace the standard messages in CW and Digital.
One simple example of strings is shown below.
Important:. Space characters (" ") have no effect in scenario definitions. To insert an actual space, use $BLANK.
Important: For contests involving serial numbers you need to secure that the sent number and
the logged serial numbers are the same. Since QSO can be interleaved in advanced SO2R,
this requires the use of a common source of serial numbers for both radios and a mechanic
to assign a specific serial number to a started QSO. In DXLog this is done using a number server.
You can find more information on how to configure this here.
SO2V
This operating mode allows you to use the radio's two VFO almost as if having 2 separate radios.
Important: SO2V only works for Radio 1 in the Options|Configure interfaces panel.
Depending on their CAT command repertoire this is implemented using either VFO selection or swapping
on single receiver radios. Some radios, e.g. FlexRadio and some Yaesu models, will work with either.
For dual receiver radios, the SO2V mechanic based on using SPLIT should be used.
In this case the option Options|Interface specific options|Dual receiver radio (Use split in in SO2V) must be enabled.
On selected radios, such as dual receiver ICOM radios, VFO knob focus will follow DXLog's focus.
On selected radios, sub receiver on/off control is also supported.
In SO2V with SPLIT on such radios, two of the audio control menu entries above
plus two additional shortcut keys are available for sub receiver control.
[Ctrl][Alt][S]toggles the sub receiver on and off when radio 1 is focused.[Ctrl][Alt][D]toggles the sub receiver to be permanently on or switch on and off with focus.
Important: On many keyboards [AltGr] can be used instead of [Ctrl][Alt].
Although not on the level of SO2R, SO2V can be a quite efficient operating mode.
Tips for the beginner
- Train in receiving with both receivers enabled.
- You will typically have your Run frequency on the main VFO (left ear) and do S&P on the sub VFO (right ear).
- Remap the Toggle subreceivier key to a more accessible key.
- When getting used to SO2V you will find yourself frequently switching the subreceiver on and off
- while focusing the main VFO. Since keyboard layouts vary greatly, a generic key,
[Ctrl][Alt][S] - is assigned to this function. This is also in line with its function in SO2R.
- A popular key to redefine for this is the one directly to the left of "1".
- This is ` on English language keyboards and § on most European ones.
- Use
Tools|Redefine keyboard keysto do this.
- Use the "rapid CQ" key.
- In SO2V,
[Shift][Ctrl][F1]switches focus to radio 1, shifts to Run, and sends CQ. - Since it is common practice to Run on the main VFO and S&P on the sub VFO, this is a very convenient key.
- Many redefine
[F1]to mean this key.
- Use the "Equalize VFO" key.
[Ctrl][F4]sets the unselected VFO to the same mode and frequency as the selected VFO.- This is a very convenient way to synchronize the two VFO when switching band or just doing S&P.
- Use the "Switch focus" key as alternative to
[Up]and[Down]
[Keypad Multiply]toggles transmit and entry focus between the two VFO.
- Use the "Switch VFO knob focus" key.
[Keypad Divide]switches the VFO knob focus on supported stations (such as recent dual- receiver ICOM and Yaesu radios) allowing you to tune around the band looking for S&P opportunities
- on the sub VFO while calling CQ, keeping entry and transmit focus on the main VFO.
- Consider using the "Swap VFO" key.
[Alt][Keypad Multiply]swaps the frequency and mode of the two VFO.- Since the main VFO is typically the Run VFO, there may be situations when this is helpful.
- Make band shift keys change both VFO
- The option
Options|Interface specific options|Band change keys affect both VFOmakes - band changes with
[Alt][F1]/[Alt][F2]change the band of both - the main and the sub VFO in tandem. This saves a lot of key presses and also reduces the
- risk of accidentally transmitting on a band which your PA and antenna is not currently set for.
- For more information on supported radio models, see the Notes on supported radios section.
For RTTY with FSK, SO2V represents a particular challenge since two instances of MMTTY will
need to access the same COM-port. This can be solved by either using a wire-or connection
(as described by W0YK at 2019 Contest University)
or a port-sharing solution like that included in the microHAM device router.
Listen to radio 1
Shortcut: [Ctrl][Alt][A] [AltGr][A]
Puts the audio of radio 1 in both ears. Not available in SO1R or SO2V.
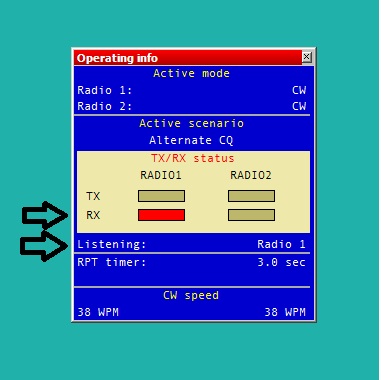
The audio status is visible in the Operating info and Rate windows
and on the entry lines if Options|Log|Show RX status color is enabled.
Listen to radio 2
Shortcut: [Ctrl][Alt][T] [AltGr][T]
Puts the audio of radio 2 in both ears. Not available in SO1R or SO2V.
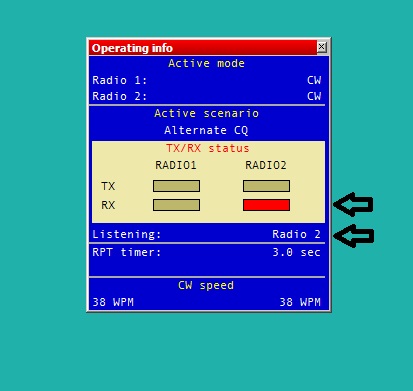
The audio status is visible in the Operating info and Rate windows
and on the entry lines if Options|Log|Show RX status color is enabled.
Listen to the focused radio
Shortcut: [Ctrl][Alt][L] [AltGr][L]
Puts the audio of the focused radio into both ears. Not available in SO1R or SO2V.
Toggle listen to both radios
Shortcut: [Ctrl][Alt][S] [AltGr][S]
Alternatively puts the audio of the each radio in one ear or the audio of the selected radio in both ears.
Not available in SO1R.
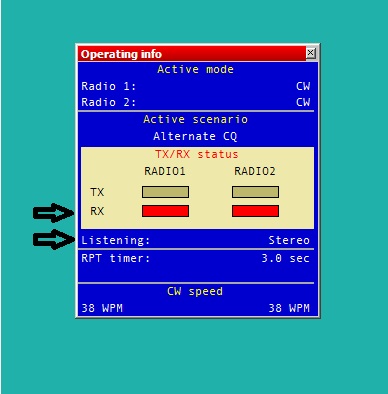
The audio status is visible in the Operating info and Rate windows
and on the entry lines if Options|Log|Show RX status color is enabled.
This key is particularly useful in SO2V since it offers a temporary override to the state of Sub receiver permanently on.
In a typical SO2V scenario you have the subreceiver permanently on and Run on the Main VFO and S&P on the Sub VFO.
To be able to better focus on a weak responder on Run you can temporarily disable the subreceiver by pressing [Ctrl][Alt][S].
Then, as soon as you change focus, the sub receiver is re-enabled and then stays enabled.
For better ergonomics it is customary to map this somewhat awkward key to the key to the left of [1].
On English keyboards, this is normally [`] and on European keyboards, this is [§].
Sub receiver permanently on
Shortcut: [Ctrl][Alt][D] [AltGr][D]
Only available in SO2V with Options|Interface specific options|Use SPLIT command in SO2V mode enabled and for supported radios.
Please see supported radios for more information.
When enabled, the sub receiver is constantly on. When disabled, the sub receiver is only on when logical radio 2 (i.e. the Sub VFO) is focused.
Edit SO2R Scenarios
Scenarios are available for SO2R Advanced and requires an external SO2R controler such as SO2R Mini or microHAM MK2R+.
The purpose of a scenario is to automate the interaction between the two radios.
A number of parameters can be controlled such as receive and transmit focus, audio routing etc.
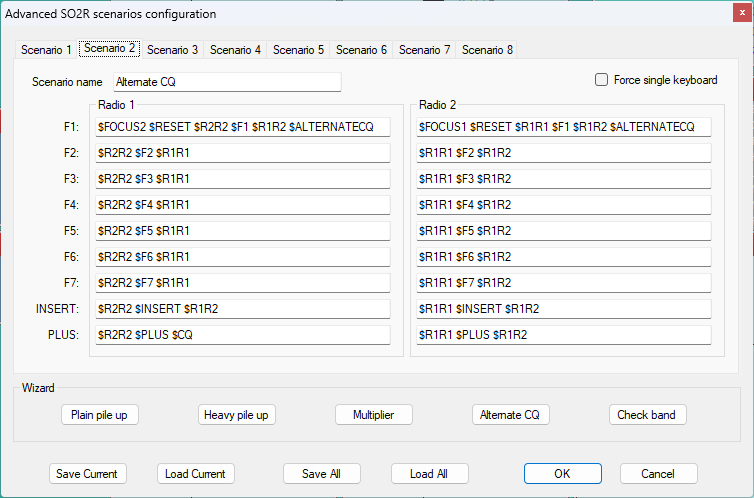
The Scenario in the picture above is called "Alternate CQ" and alternatively calls CQ on both radios.
When you press F1 on R1 (primary radio):
Log cursor swaps to R2 call-field line (command $FOCUS2)
Any possible audio choice activated by keyboard is deleted (command $RESET)
RX focus (audio) is switched to R2 on both ears (command $R2R2)
Starts to send message saved on F1 memory i.e. CQ CONTEST (command $F1)
RX focus (audio) is changed to R1 left ear and R2 right ear (command $R1R2)
When F1 memory is completely sent it swaps again log cursor on R1 and starts TX F1 to R2 (command $ALTERNATECQ)
If you have a caller and you start typing the callsign in log, after the CQ on opposite radio is sent,
DXLog recognize the field is populated and stops CQ-ing and gives TX focus to the radio with callsign.
At this moment you can work the station by pressing Insert.
There are a number of predefined scenarios. They can be modified or you can design your own using the below listed macros.
Any macro command can be used in an SO2R scenario but it is recommended to only use control (e.g. $R1R2) and message (e.g. $F1) macros.
All available macro commands can be found in the macro commands section.
Important:. Space characters (" ") have no effect in scenario definitions. To insert an actual space, use $BLANK.
All strings can be edited "on-the-fly" pressing [Shift][Fx] if enabled with Tools|Message editors.
SO2R scenario selection
There are some available scenarios in DXL but you still can make new ones and save them using a specific name.
You can select a tab in scenario editor window and play with it
When you are operating you may need to change scenario according to operative situations.
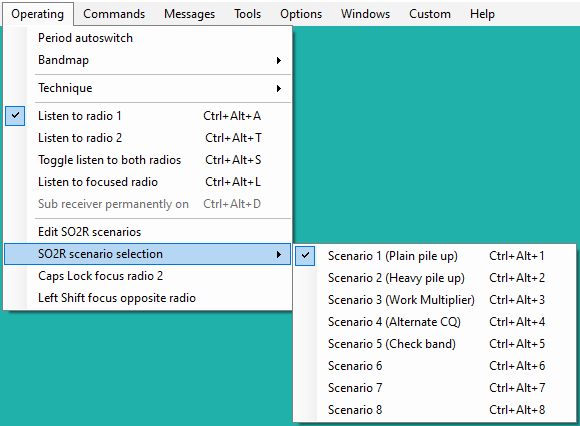
You can go to menu Operating|SO2R scenario selection and choose one scenario from the pop-up window.
You can also use shortcuts to select the desired scenario using [Ctrl][Alt][#] with # being the number of the desired scenario.
There is also a custom Form DLL for mouse selection of scenario. It can be downloaded here: http://DXLog/sw/files/utilities/DXLogScenarioPanel.dll
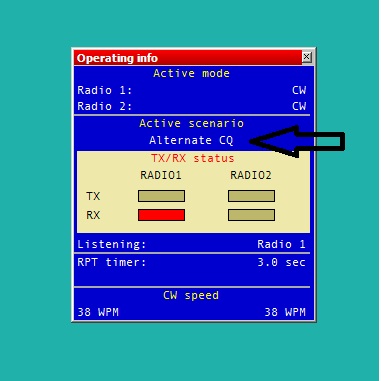
The currently chosen scenario is always visible in the Operating info window.
Caps Lock focus radio 2
Activating [Caps Lock] will switch focus to radio 2. Turning off [Caps Lock] will return focus to radio 1.
Left Shift focus opposite radio
Pressing (and holding) the LEFT [Shift] (when using an SO2R technique) will direct keyboard
input to the opposite radio log line. Note that releasing the LEFT [Shift] will return input
to the first radio.
Important: This function has a lot of limitations. It only works for the F keys. It prevents the use of
functions like on-the-run message edit and keyboard RIT as well as shifted keys like /, ?, and + on European
keyboards.
