Getting started
Contents
- 1 Introduction and plea
- 2 User interface
- 3 Creating a log file
- 4 Controlling the radio
- 5 Databases
- 6 Operating techniques
- 7 Standard messages
- 8 Voice memory playback
- 9 Useful settings
- 10 ESM
- 11 Connecting to the DX cluster
- 12 The bandmap and other windows
- 13 After the contest
- 14 Tips and tricks
- 15 DXLog system files
Introduction and plea
DXLog is a very powerful contesting software with enormous flexibility.
Unfortunately this comes with complexity and a significant learning curve for new users.
This wiki is written by DXLog experts who may be somewhat blind of the needs of a new user.
If you have ideas for improvement of this section, please share them with the development
team via the support reflector.
User interface
Contest loggers are a little like clothes. Some like a particular style, some don't.
DXLog has a classic look and feel and builds on a long tradition when it comes to
keyboard shortcuts and other UI elements. It is keyboard-centric and designed so you
should very rarely have to take your hands off the keyboard.
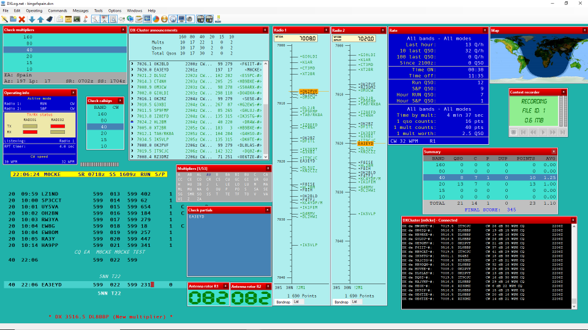
Contrary to e.g., N1MM Logger+, DXLog's default setting is to use a single window, a "desktop".
There are many benefits with this, for instance the fact that you can rapidly switch between
the logger and another application, such as a web browser, with [Alt][Tab].
It also allows other applications that have the ability to stay "on top" to do this also with DXLog.
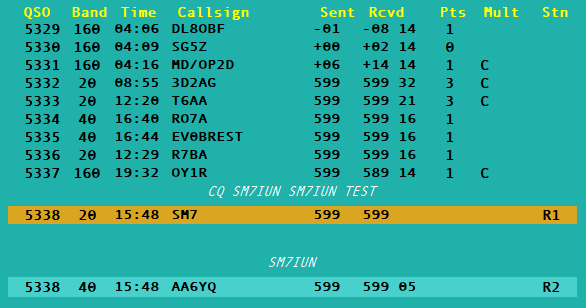
DXLog follows the tradition of many other loggers and have one or two entry lines and the nine
most recent log entries in fixed locations in the main window. The entry lines are either on
top or beside each other and, unless you are using dual keyboards, you move between them
using the arrow keys.
DXLog shares many characteristics with other loggers but for those used to e.g. N1MM Logger+,
there are two very important differences.
- The log and the entry lines are connected. Using the arrow keys, moving up past the top
- entry line will take you into the log.
- You can modify a logged QSO but not delete it. In the spirit of old school contest logging,
- you can only mark it invalid. This is done by navigating to the QSO and pressing
[Ctrl][X]. - The "old school" method of changing the callsign of the QSO to your own is also supported.
- The numbering and use of the standard messages is different.
The entry line is divided into fields, most of them are read-only like QSO number, band, mode, time, etc.
Each contest has at least callsign and one exchange field. Some contests have several exchange fields.
You move between major fields by pressing [Space] and between all fields with [Tab].
RS/RST is not a major field.
The callsign is checked for validity using this regular expression:
^((([A-Z1-9]+0?\/)?[1-9]?[A-Z]{1,3}[0-9]+[A-Z]+(\/[A-Z0-9]+)?(\/[AMP]{1,2})?)|RAEM|EA0)$
When you have completed your entry, you typically log the QSO using either [Enter] or [+].
The location and visibility of the log and entry line column headers can be controlled with Options|Log|Headers.
Note that the rightmost Stn station type column becomes visible only when activating networking or selecting
an operating technique other than SO1R.
Creating a log file
To start using DXLog, the first step is to create a log file. Without an open log file,
DXLog will just show an empty desktop.
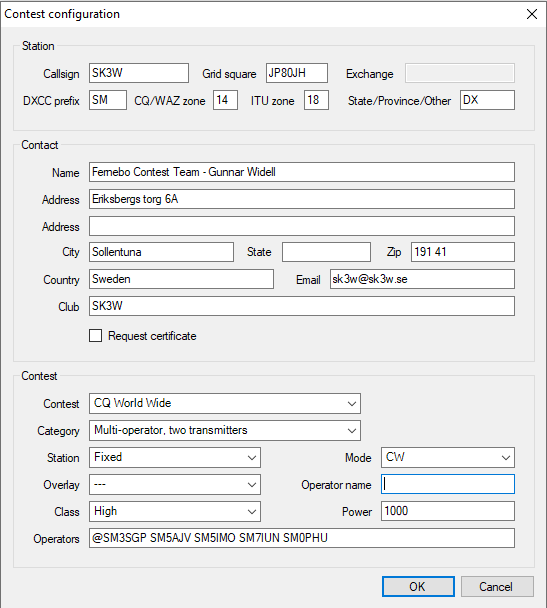
To create a log, select File|New. This opens the contest configuration window.
DXLog needs exclusive and unrestricted access to its log file and relies on Windows'
standard file permissions for this. This means that some types of shared or synchronized
directories, or directories in virtualized environments, may not work for log file storage.
Unlike most other loggers, DXLog is compatible with Microsoft OneDrive.
There are many text boxes to fill and not all are used by all contests, but it is a good idea to
fill as many of them as possible since it will save you typing each time you create a new log.
Should DXLog miss information from you when you click the OK button, you will get a helpful popup
window and the cursor will be placed in the field with missing or invalid information.
Important: The content of fields like Exchange and State is not always the actual exchange
or state. For instance, the Exchange field may contain keywords like "DX" to tell DXLog to use a different
type of exchange, such as a serial number.
After having clicked OK you will get a browser window that allows you to decide the name and location
of your new log file. It is good practice to use a separate directory for each contest since you will have
other files related to the contest, call history files, export files like Cabrillo, ADIF, SUM, etc.
It is also a good practice to include things like contest name, station callsign and year in the log's filename.
The first time a log is created after the installation, "factory default" colors and window locations
will be used. From this point on, every time you create a new log, the color settings, the active
windows and their location will be inherited from the most recently opened log. This means that if you
for instance run a weekly test in which you want a particular layout or color scheme, it is a good idea
to open the previous' weeks log before creating a new one.
Also note that messages are stored on a per-contest basis. This means that when creating a new log, the
messages from the previous, same contest will be used. If there is none, the contest's default messages will
be used. Since some contests have messages based on location or participation status, this is important
to be aware of.
You will find much more information in the contest configuration section.
Controlling the radio
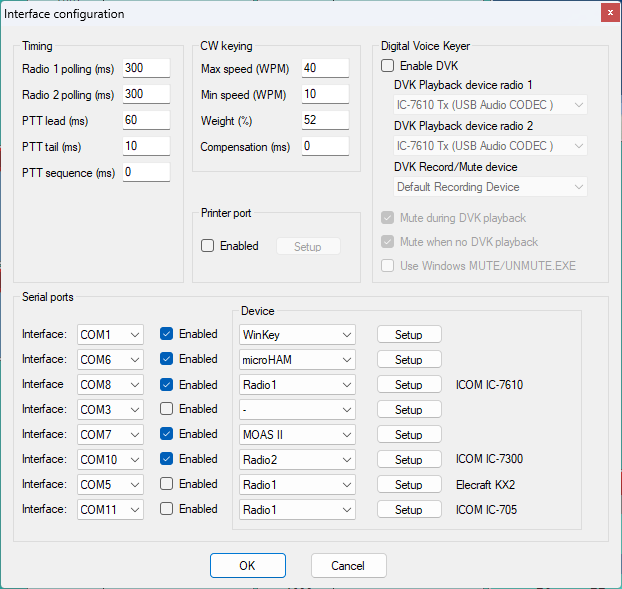
The next step is to set up the communication with the radio. You reach the radio interface by
either clicking Options|Configure interfaces or by typing the text command SETUP
and pressing [Enter] on the entry line.
There are numerous settings and alternatives in how to set up your radio. On some models special
features like diversity, or the built in voice keyer, is supported. In this panel you can also
configure the control of peripherals such as SO2R controllers. You can find more information in the
Configure interfaces section.
You can also find general recommendations about settings for particular radio models in the
supported radios section.
Setting up DXLog for digital operation involves many settings.
John G4IRN has prepared an excellent tutorial on this topic which can be viewed here.
Databases
The next step is to make sure two important data bases are up to date; the country data base CTY.DAT
(and its siblings) and the callsign database MASTER.SCP.
The menu Options|Data files|Country files opens a window that allows you to update three
alternative country databases. Chose one at the time and click Download. Normally the most detailed,
CTY_WT_MOD.DAT is the recommended one to use.
The callsign database is updated with the menu Options|Data files|Super check partials|Update.
To make all updates come into effect, type RELOADNOW followed by [Enter] or simply
close and restart DXLog.
Operating techniques
The next step is to chose your operating method, Technique in DXLog terminology.
DXLog supports four different techniques; SO1R, SO2V, SO2R, and SO2R Advanced.
SO1R means Single Operator, One Radio. SO2R means Single Operator, Two Radios. SO2V means Single Operator,
Two VFO but in practice this is normally also Two Receiviers. In a multi-operator setting you typically use
SO1R but an advanced operator can also use SO2V.
The menu Operating|Technique let you choose between SO1R, SO2R, Advanced SO2R and SO2V.
Each technique supports two operating "states"; Run and Search & Pounce (or S&P for short).
Run means you call CQ and work calling stations. S&P means you search for stations and work them by calling them.
Each state has a separate set of predefined messages (see below) and ESM behavior (also see below).
The keyboard shortcut to switch between the states is [Ctrl][Tab].
There are also some options for forcing an automatic change, such as
Tools|Data entry|F1 returns to Run always and Tools|Enable automatic Run/S&P selection.
SO1R
SO1R is the most basic and it is the method you use in a single operator setting using a single
receiver radio or in multi-station setting.
When using this technique, you have a single entry line and one radio with one receiver.
The band map shows the band map for the currently selected VFO.
In the top of the bandmap the frequencies of VFO A and VFO B are shown in boxes.
The boxes are clickable and you can also switch between the VFO using [Keypad *].
If you want to make a rapid excursion to work e.g. a multiplier, you can always jump back to
your Run frequency with [Alt][F4].
Important: SO1R only works for Radio 1 in the Options|Configure interfaces panel.
SO2R and Advanced SO2R
uses two radios which operate in parallel, each having a separate entry line. (Although you never
transmit with more than one at any time.)
In "standard" SO2R you operate by manually switching your "focus" between the two radios.
This is done using the up and down arrow keys or [Keypad *].
SO2R also supports external audio control by a large range of SO2R controllers such as all microHAM
keyers/controllers or devices such as the YCCC SO2R box or SO2R mini.
In Advanced SO2R the focus shifting is typically scripted, using up to eight different "scenarios" for different
situations such as hunting for multipliers, alternating CQ, or managing a large pile-up.
More information can be found in the Advanced SO2R section.
This feature is particularly appreciated by advanced contesters.
SO2R requires two radios (Radio 1 and Radio 2) configured in the Options|Configure interfaces panel.
Important: If running a contest where the exchange is a serial number, you must use a number server and number
reservation to secure that the transmitted and logged serial number are the same. You will find more
information about this in the using a number server section.
SO2V
At a first glance, SO2V looks similar to SO2R but uses only a single radio (two "R" entry lines).
This method is primarily intended for dual receiver radios (such as Elecraft K4, ICOM IC-7610, or Yaesu FTDX101D)
but offer some usability and efficiency benefits also for single receiver radios.
Like in SO2R, learning to have one receiver in each ear will maximize your efficiency.
The logical model of SO2V is two radios with a shared transmitter.
Unlike SO2R, the two "radios" are typically on the same band.
Split band SO2V puts very challenging requirements on antenna and amplifier band switching speed
and requires a very careful station design. DXLog offers no protection against e.g., hot switching
in such a situation.
The most common way to operate SO2V is to switch focus between the two "radios" the same way
as in "standard" SO2R; using the arrow keys or [Keypad *]. However, dual keyboards may also be used.
It is common practice to run (i.e. call CQ) on the main VFO (left ear) and do S&P on the sub VFO (right ear).
One of the reasons for this is tradition but another is that RIT is only supported on the main VFO on many radios.
More information about operating SO2V can be found in the SO2V menu item section.
On selected radios (such as more advanced ICOM radios), automatic VFO knob focus and sub receiver control
is supported. (C.f. the supported radios section.)
Important: RTTY SO2V requires the use of FSK together with a radio controller that offers two
FSK keying COM-ports for the same radio, such as the microHAM series of keyers.
It is also possible to use SO2V with single-receiver radios. There is a benefit in having separate band
map for each VFO and being able to rapidly switch between VFO A and B.
Important: SO2V only works for Radio 1 in the Options|Configure interfaces panel.
More information about the four possible techniques can be found in the operating technique section.
Standard messages
A fundamental feature of a contest logger is the ability to send predefined messages.
DXLog has two types of predefined messages; the Standard messages and the Additional messages.
The standard messages contain two sets; one for Run and one for Search & Pounce.
You reach the configuration panel for the standard messages by pressing [Ctrl][Alt][C],
clicking Options|CW/Digi|Modify standard messages, or typing the text command MSGS.
Each standard message is associated with a function key; [F1] to [F7], [Insert] and [+].
In this wiki, they are also referred by these names.
The use of each message follow a long standing tradition in contest loggers and since functions in DXLog
(e.g., ESM and DVK) assume the messages are used this way, do not use them differently unless you know
exactly what you do.
| Message | Use |
| F1 | Initiate QSO: CQ (RUN) or own call (S&P) |
| F2 | RST and contest exchange |
| F3 | Contest exchange, typically unabbreviated |
| F4 | Own callsign |
| F5 | Other station's callsign |
| F6 | Request for repetition |
| F7 | Query (CW) or QRZ (digital) |
| Insert | Make QSO. Conclude QSO in S&P. |
| Plus | Confirm QSO. Conclude QSO in RUN. |
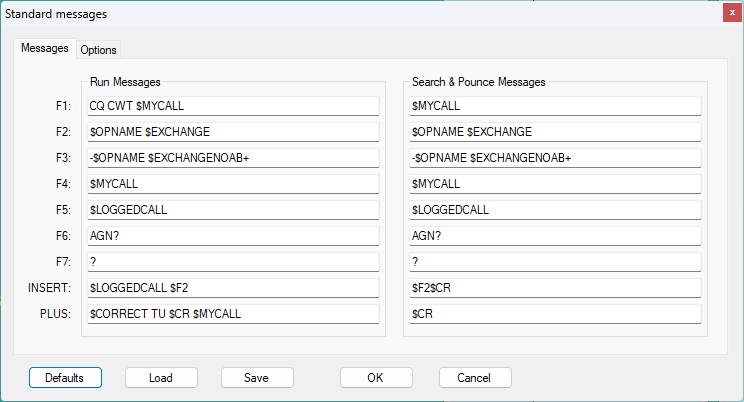
When creating a new log for the first time in DXLog, the standard messages are automatically populated.
(If the log is not your first for the particular contest, the messages from the previous time will be used.)
Below is one example.
The messages are composed by regular letters and numbers, special characters, and macro commands.
Macros always start with a dollar sign, e.g., $RST, $LOGGEDCALL, or $CORRECT.
Special characters are mainly used to control the CW keying, e.g., ^ means a half word space
and + means an increase of the CW speed by 4WPM.
A full list can be found in the macro commands and special characters section.
Since the exchange, CQ etc. varies between contests, every contest has its own set of default messages.
These default messages are however only used the first time a log is created for the particular contest.
To allow customization, all following logs created for a particular contest use the messages from the
last time a log was saved for this contest. This means that you never have to repeat customizations
such as adding $CLEARRIT to your CQ macro, etc. There is a very large repertoire of macros available.
You can even call own scripts in the message using the $!scriptname syntax.
You can always return to the default messages by clicking the Defaults button. This can also be helpful
when switching "role" from a previous time you participated in the same contest, such as member/non-member,
IOTA station/non-IOTA station.
A complete list of macros and special characters as well as the very powerful conditionals syntax
can be found in the message macros section.
Space characters in the beginning or end of the message are always ignored. To introduce a delay, use $DELAY.
Important: Contest definitions in DXLog are constantly corrected and updated. If you find that
the messages from the previous time you participated in a contest are wrong, the first thing to try is
to reset the messages to their default values.
Important: If you run CW and want to secure good spotting by the Reverse Beacon Network,
do not use speed changes in your CQ message. Your CQ does not have to repeat your call but to get
spotted, RBN needs to see your call at least twice in a time window corresponding to 256 morse
code characters at your current transmit speed. Apart from your callsign, a CQ must include at
least one of the following keywords to bet spotted: CQ, QRZ, UP, TEST, NA, SS, FD, or UP.
Sprint contest
Sprint contests, like the NCCC Sprint and the NA Sprint are different in that the calling station
"inherits" the QSO frequency, forcing operators to be very active and making spotting irrelevant.
The "Sprint exchange logic" checkbox in DXLog's Standard messages panel is a relic from older loggers
and requires DXLog to be fixed in Run mode which therefore prevents the use of ESM.
A more modern way of operating a sprint contest that fully leverages DXLog's ESM, while still supporting
operation using F-keys, is described below.
First, make sure the following options are checked:
Tools|Data entry|Enable Run/S&P switching
Tools|Data entry|Enable automatic Run/S&P switching
Tools|Data entry|F1 key forces Run mode
Tools|Data entry|Enable ESM mode
Tools|Data entry|Focus received exchange after sending exchange in Run (Optional)
The example below is from NCCC Sprint and works like follows:
Being called:
- You call CQ by pressing [F1]. If you are already in Run, you can just press [Enter] with an empty callsign field.
- When you are called, you enter the callsign and press [Enter]. This sends the Run Insert message $LOGGEDCALL $MYCALL $F2.
- (With the option above, DXLog can automatically move the cursor to the exchange field at this point)
- If you need to resend, you can press [Enter], [Insert], or [F2] depending on the circumstances.
- You enter the received exchanges and press [Enter] again, this will send the Run Plus message ee and log.
- Moving to a new frequency will take you to S&P mode.
Calling:
- You are in S&P and with the cursor in the callsign field you call a station by pressing [Enter].
- When the station answers, you press [Space] and enter the received exchanges.
- Pressing [Enter] will now send the S&P Insert message $LOGGEDCALL $F2 $MYCALL, log, and switch to Run.
- If you need to resend, you press [F2].
- You now "own" the frequency, and being in Run, you just need to press [Enter] to call CQ.
Voice memory playback
In phone contesting having a means to transmit a pre-recorded CQ message is a great help.
Sometimes for other messages too.
DXLog has a built-in voice recorder (often referred to as a DVK - digital voice keyer) but also supports the
use of that built into many radios and peripherals. (More information can be found in the Digital Voice Keyer section.)
Important: If you use the radio's built in voice keyer, make sure to check the box
"Do not use PTT with voice keyer" on the COM port controlling your radio's PTT to avoid a
self-locking PTT loop and to make sure the transmitter's audio source is not forced to be the microphone.
If you want to use ESM (see the ESM section) also on phone the message
content convention from CW and digital modes need to be followed.
| Message #1 | CQ message. E.g. "SM7IUN, contest" |
| Message #2 | S&P exchange, when the contest allows. E.g. "Roger, you are five nine fourteen" |
| Message #4 | Own call. E.g. "SM7IUN" |
| Message #6 | Request repeat. "Again, again?" |
Important: On Phone in SO1R, SO2V, and SO2R, macro commands are only recognized in the
INSERT and PLUS messages and are ignored in messages 1 through 7. In SO2R Advanced, however,
each used scenario needs to include the wanted playback macros, $F1, $F2, etc.
Important: A useful message can be the one associated with logging the QSO in RUN.
E.g. "Thank you and good luck, SM7IUN, contest". However, for this to work, the RUN PLUS message
must contain the macro commands to send a message and log. (e.g. $PBPLUS $CR).
Since the INSERT message i RUN contains the other station's call it can not be prerecorded.
Following the conventions above, the standard INSERT message will however work for S&P.
Useful settings
Since this is just a quick-start guide, only the most commonly used or misunderstood settings will be covered here.
Options|Load contest at startup
- Guarantees that the right log file is opened after e.g. a power outage or a reboot.
- Very important to enable in a multistation setting since opening the wrong log file while
- networked with other stations will force merging of the logs which normally is highly undesired.
Options|Interface specific options|Dual receiver radio (Use split in SO2V)
- A very important setting for SO2V. Should be enabled for dual receiver radios and
- disabled for single receiver radios.
Options|Interface specific options|Band change keys affect both VFO
- Makes band changes with
[Alt][F1]and[Alt][F2] - switch the band of the selected radio's both VFO. Recommended.
Options|Log|Show border on TX
- Shows a colored frame around the entry line of the currently transmitting radio.
- Recommended.
Options|Log|Show previous/current messages
- Shows the current and previous messages sent on the screen.
- Very convenient e.g. when running SO2R with low or no sidetone.
Options|Log|Show cursor in entry line without focus
- Shows a shadow cursor in the unselected entry line. Highly recommended.
Tools|Data entry|Enable ESM mode
- Makes
[Enter]send relevant messages in both Run and S&P. - Also toggles with
[Ctrl][M]. For for more details, see the ESM introduction.
Tools|Data entry|Enable Run/S&P switching
- Allows switching between Run and S&P. Recommended setting unless in a DX-pedition.
Tools|Data entry|Enable automatic Run/S&P selection
- Makes DXLog automatically switch to S&P when you move the VFO knob or grab a spot. Recommended.
Tools|Data entry|Exchange guessing|Automatic
- When applicable, produces an exchange guess as you type. Does the same also for dupe
- and new multiplier information. Highly recommended.
Tools|Data entry|F1 forces Run mode
- Makes the
[F1]key always switch to Run, mark the CQ frequency and send CQ. - Recommended.
ESM
ESM, or Enter Sends Message, which the acronym stands for, is a popular and widely used
way of streamlining the QSO process in a contest logger.
There are different schools in how ESM should work and loggers differ in their implementation.
DXLog has a very straightforward and deterministic ESM. It is stateless which means that it
does not try to guess the intentions of the operator based on past actions.
The message sent by [Enter] only depends on three factors:
- Operating state (Run or Search & Pounce)
- The location of the cursor
- The content of the current field
This makes DXLog's ESM 100% predictable and easy to learn.
Since ESM may be undesired on Phone the option Tools|Data entry|ESM mode only for CW
allows you to use it only for CW in e.g., a mixed mode contest entry.
DXLog ESM assumes the following configuration of the standard messages:
- RUN F1 - CQ message
- RUN F6 - Request exchange
- RUN INSERT - Send other call and exchange
- RUN PLUS - Send corrected call if required, log and send semi-CQ (such as own call)
- S&P F1 - Own call
- S&P F6 - Request exchange
- S&P INSERT - Send exchange and log
The function is as follows:
Run
Run means you call CQ and stations call you.
Pressing [Enter] in RUN will:
- with the cursor in an empty callsign field send RUN F1, typically CQ
- with the cursor in a partially or correctly filled callsign field send RUN INSERT
- with the cursor in an incorrectly filled exchange field send RUN F6
- with the cursor in a correctly filled exchange field send RUN PLUS
The typical sequence of a Run QSO with ESM is
- with an empty entry field, you press
[Enter]to call CQ - when called, you type the caller's callsign and press
[Enter] - if the caller does not come back to you, you press
[Enter]again - when the caller comes back to you, press
[Space]to move cursor to the exchange field - you type the caller's exchange, or just accept a pre-fill, and press
[Enter]to conclude the QSO - repeat
For a big gun station, where correct reception of the exchange is (almost) guaranteed, you can
automatically shift focus to the exchange field after having sent the exchange by enabling the
menu option Tools|Data entry|Focus received exchange after sending exchange in Run.
Search & Pounce
Search and Pounce or S&P for short, means you search for stations and call them.
Pressing [Enter] in S&P will:
- with the cursor in the callsign field send S&P F1
- with the cursor in an empty or incorrectly filled exchange field send S&P F6
- with the cursor in a correctly filled exchange field send S&P INSERT
The typical sequence of a S&P QSO with ESM is
- having grabbed or manually entered the other station's callsign, you press
[Enter]to call - if the station does not respond, press
[Enter]again - when you get a response, press
[Space]to move to the exchange field and type the exchange or accept a pre-fill - press
[Enter]to send your exchange and conclude the QSO - if the other station did not get your exchange correctly, press
[Insert]to send it again to make sure you get logged - repeat
For a big gun station, where correct reception of the exchange is (almost) guaranteed, you can automatically
shift focus to the exchange field after having called the station by adding the $SPACE macro to the S&P F1 message.
You can find more information on ESM in the Data entry menu section.
Connecting to the DX cluster
DXLog offers two ways of connecting to the DX cluster, one basic, included in DXLog, and one advanced,
relying on a companion program.
Important: If your current log is unassisted (either by selection or since the contest rules generally
forbid assistance), DXLog will not display any cluster spots, even when connected. If the contest allows self-spotting,
you can however spot yourself.
Basic connection
Since an increasing number of contests allow self-spotting, also on unassisted entries, DXLog always allows
connecting to the DX cluster but does not display incoming spots when the log is set to an unassisted entry category.
DXLog's default cluster node is VE7CC. If you prefer another node, you click Options|DX cluster|Edit connection list.
This opens a window that allows you to edit existing entries, add new ones, and select a new default node. (More HERE).
If you get lost editing the list, you can always reset it to "factory" settings with Options|DX cluster|Reset connection list.
Checking Options|DX cluster|Reconnect default cluster node at startup will make sure you are always
connected when running DXLog.
You connect by clicking Commands|DX cluster|Connect default or Connect other.
This will bring up a dialog with your default login information. Its content is remembered by DXLog between sessions.
Clicking Windows|DX cluster monitor or pressing [Alt][O] will bring up a window that shows the
telnet text flow from the cluster node. Although meaningless to use for catching spots, it can be used to make sure
the connection is correct and see error messages if the login procedure fails.
Spots should now start appearing in your bandmap.
DXLog will only display spots of the mode or modes relevant for your contest entry.
Advanced connection
If you are in a multi-station setting and want to separate the cluster connection from your operating positions or
have a need to connect to multiple spot sources, you can use the DXLog.net.DXC companion program.
DXLog.net.DXC distributes spots on a LAN to one or several instances of DXLog via the normal DXLog multi-station
networking protocol. This means networking must be enabled and correctly configured.
Make sure Options|Enable network is checked and that "networking for multiple stations" is checked in the
network configuration panel. Also make sure that the station's networking IP address is correct. It should typically
be the computer's IP address with the last number replaced by 255.
DXLog.net.DXC offers a rich set of features including blacklisting and skimmer control. More information can be found HERE
In DXLog.net.DXC, enter your callsign by clicking Settings|User data. Also check your network settings
under Settings|Network. For a single station setting, you can click the Local defaults button which will not
send spots outside your computer. Clicking LAN defaults will distribute spots to your entire LAN.
The checkbox Cluster cmd should be checked for at least one cluster connection.
This checkbox controls to which nodes commands from DXLog (such as self spots) are forwarded.
You connect to the cluster node by clicking the Connect button.
If everything is correct, you should now see spots arriving in the Windows|DX cluster monitor window on all networked stations.
If the current log's category is assisted, they will also appear in the bandmap.
If you are running DXLog.net.DXC on a separate computer or server and want to establish all cluster connections automatically
when DXLog.net.DXC is started, check Operating|Connect all tabs at startup.
The bandmap and other windows
Beside the entry lines, the bandmap is one of the most central functions in a contest logger.
The two bandmaps are enabled with Windows|Radio 1 and Windows|Radio 2.
(Note that only one is available in SO1R.)
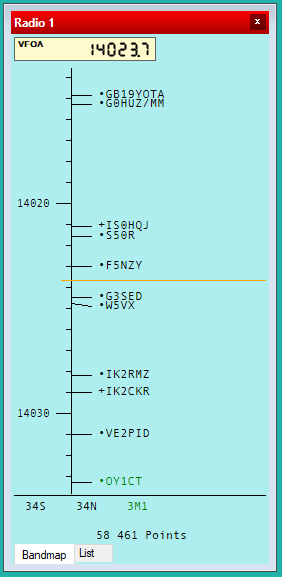
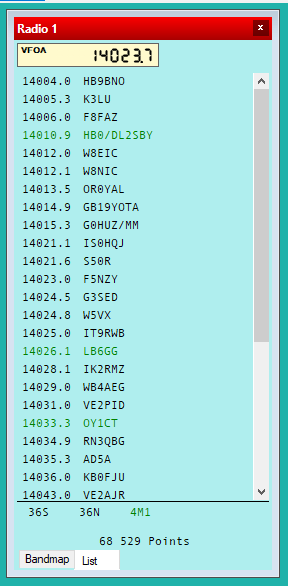
With an internet connection to the DX Cluster you will see the spots spread out over an intuitive,
thermometer-like representation of a part of the current frequency band or as a color-coded listing.
You can either let DXLog connect directly to the DX Cluster (as described in the DX Cluster section)
or via the DXLog.net.DXC cluster connectivity utility, described in the DXLog.net.DXC section.
The bandmap can be set up to convey a large amount of useful information such as if a spot represents
a new multiplier, if it has been worked before, a suitable antenna direction, the sun's position at the
station's location etc. You can quickly jump between spots by holding down [Ctrl] while pressing
the up and down arrow keys. (There are many more keyboard shortcuts associated with the band map, for more
details, see the keyboard functions section.)
The bandmap can be zoomed in and out using the scroll-wheel on the mouse. The settings are available by right-clicking
the bandmap and selecting Properties. Further information about the bandmap can be found in the bandmap section.
The bandmap is also very useful when operating without a DX cluster connection, a.k.a. unassisted.
You can add stations to the bandmap by entering the call and pressing [Ctrl][Enter].
Such manually entered stations are automatically erased when worked in Run.
Stations worked in S&P are also added to the bandmap to avoid you having to identify them again.
Important: The bandmap contains some S&P features, such as wiping the currently entered call and/or adding an
entered call to the bandmap when tuning away from it, that are active also with no bandmap window open.
You find these settings by selecting Properties in the bandmap context menu.
In the Bandmap properties panel you will also find the spot lifetime settings. These control how long a spot will
be displayed before erased. A suitable number for cluster spots is 11 minutes for CW and RTTY (RBN has a respotting
timer of 10 minutes) and 20 minutes or more minutes for phone and other digital modes. For manual spots, 30 minutes
is a reasonable number.
Besides the bandmap there are many useful windows available. DX cluster announcements can show you a
list of all valuable spots as one single list.
Check Partials and Check N+1 helps you guess callsigns you are unsure of. Check Multipliers gives
information on which bands you have worked a certain multiplier.
Finally Clock is a very helpful little bar showing essential information like exact time, operating
state, logged in operator etc.
After the contest
After the contest you typically want to create a Cabrillo or EDI file for submission and perhaps an ADIF file to
upload to LoTW or import in a bulk logger.
Cabrillo files are exported using File|Export|Cabrillo and ADIF files using File|Export|ADIF.
ADIF exports offers you the option to also include X-QSO, which you normally do not want to do. There however situations
when you may want to include them, such as when excluding valid QSO on another band for a single band contest entry.
If your contest uses a prefill database, and you trust your log, you can update the database using
Options|Data files|Update database. It is possible to update data files of any supported type.
Be however aware that your own updates will be lost the next time an updated database is included in a new DXLog release that you install.
If you really want to preserve your updates, make a copy of DXLog's database in the same directory as the log file.
More on how to manage prefill databases can be found in the prefill database settings section.
Entering postcontest mode with Edit|Postcontest mode will allow you to edit all properties of the logged QSO using [Alt][F]
and [Ctrl][F1]/[Ctrl][F2]. It also allows entering a paper log by opening the time field for direct entry.
Tips and tricks
- If you connect to the DX cluster and see no spots in your bandmap, make sure you
are not using an unassisted contest entry.
- Try the world map. It will show where you are spotted on the DX cluster.
- Try SO2V. You will have more fun and become a an even more productive operator with just one radio.
- Get acquainted with ESM. Once familiar with it, you will find it very convenient.
- On most radios
[Shift][Up]and[Shift][Down]work as RIT in Run and frequency
adjustment in S&P.[Shift][Delete]zeroes RIT regardless of operating mode.
[Ctrl][Up]and[Ctrl][Down]jumps between spots in the bandmap and
grabs them onto the focused entry line.
[Ctrl][Space]grabs the spot in the bandmap on or close to your current frequency.
[Ctrl][Alt][Up]and[Ctrl][Alt][Down]jumps between spots in the other VFO or radio,
depending on ifOperating|Bandmap|QSY Opposite radio instead of 2nd VFOis checked or not.
[Shift][Ctrl][Up]and[Shift][Ctrl][Down]jumps to the next spot that is a multiplier.
- Double-clicking a spot in the bandmap grabs it. There is a menu option change this to single click.
[Ctrl][Enter]creates a spot using an entered callsign and the focused radio's frequency.
[Alt][K]opens a panel for sending CW or a conversational digital mode directly
from the keyboard. It is closed by pressing[Alt][K]or[Enter].
[Ctrl][Alt][+]or[Ctrl][Alt][Keypad +]forces a QSO to be logged,
disregarding all validity checks.
- Pressing
[Ctrl][X]with the cursors on a QSO in the log will "delete" the QSO by marking it invalid.
[Shift][Ctrl][F1]shifts focus to radio 1, switches to Run, and sends CQ in SO2R and SO2V.
In SO1R and SO2R Advanced it just sends the F1 message.
Depending on your operating preferences you may want to redefine[F1]to always execute this key.
[Alt][Q]activates "intelligent quick QSL" which is a great convenience for
DXpeditions and large contest stations. It uses rate statistics to send a short confirmation
at the end of each QSO but still regularly send the full callsign.
- The text commands RELOAD and RELOADNOW reloads and rescores the current log.
The latter skips the confirmation popup. (This command also refreshes contest definitions
and scripts without event handlers.)
- RESET eller
[Ctrl][Alt][R]resets all hardware interfaces.
When connecting/disconnecting equipment or in the presence of EMC or RFI issues, this can be very helpful.
- To search for a certain callsign in your log, type the callsign in the entry field.
The Check Callsign window will show you which bands you have worked the callsign on.
Double-click the red checkmark to jump to the corresponding QSO in the log.
Return to the entry line with[Ctrl][End]
- Holding down
[Ctrl]during start-up of DXLog will give you the option to not restore the
previous layout and log file.
- On many contests you can do a reverse look-up from a prefill data file by entering the exchange
and pressing[Space]. This will show the candidate matches in the Check Partials window.
- On many contests where the exchange is a grid, you can type a six-character grid in the callsign
entry field and press[Space]to get distance and azimuth.
- If you have problems starting DXLog, as a last resort go to the directory
%appdata%using
the[Win][R]key and rename the DXLog.net directory. Then try again.
DXLog system files
Log and export files can be stored anywhere on your computer but in line with
Windows' application programming standard, DXLog keeps its internal system files
in a special, normally hidden, directory.
This directory can be opened either via Windows' file explorer, using the symbolic address
%appdata%\DXLog.net or using DXLog's menu item File|Open configuration directory.
Important: The only real need a regular user has to open this directory is to install contest or
database updates between regular DXLog releases or at emergencies.
Updates to contest definitions and/or databases are better updated by clicking File|Update contest.
The content of the configuration directory is the following:
- Directory Contest
- contains a working copy of all contest configuration files.
- Directory Database
- contains a working copy of all database, country, warning and regexp files.
- Optional directory CustomForms
- when exists contains custom form DLL files.
- File DefMsgs.sdb
- Default messages for all contests operated. Not editable.
- File deftest.dxl
- Default contest configuration. Not editable.
- Optional file DXCSpotHistory.txt
- Result of checking "Incoming spots logging" in DX Cluster announcement window.
- Optional file DXCStreamHistory.txt
- Result of checking "Stream logging" in the DX Cluster monitor window.
- File DXLog.net.config.backup
- A backup copy of the most recent working DXLog.net.config
- File DXLog.net.DXC.config
- DXLog.net.DXC configuration data
- File DXLog-debug.txt
- Crash and error logging file
- File SERIAL-TRACE-...
- Serial communications debugging log
